Author: dev@revnix.com

  • Top 10 SEO Plugins for WordPress in 2026

    Top 10 SEO Plugins for WordPress in 2026

    Discover the top 10 SEO plugins for WordPress in 2026 to boost your website’s search engine optimization. Get insights on the best tools for your needs!
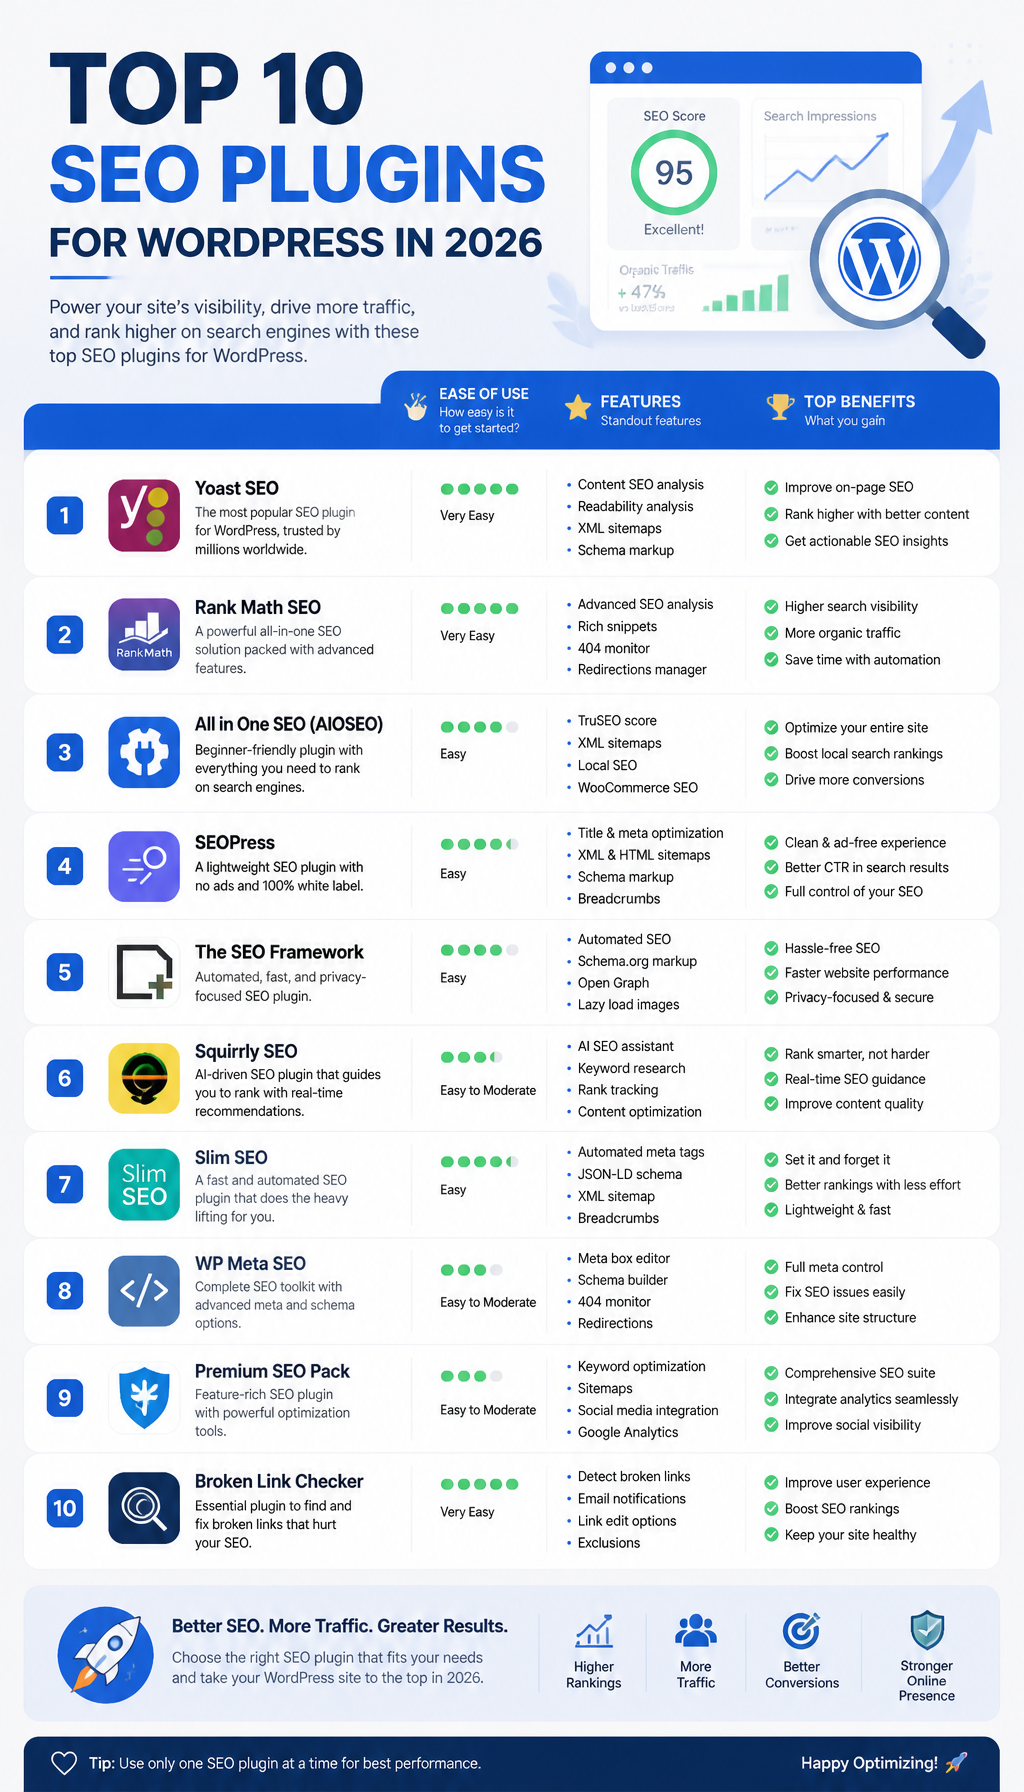
    Featured image for Top 10 SEO Plugins for WordPress in 2026

    Discover the Top 10 SEO Plugins for WordPress in 2026

    When it comes to WordPress SEO, the “best” plugin is the one you’ll keep configured correctly six months from now. These are the 10 I see used most successfully in 2026—across blogs, small business sites, and stores.

    1. Yoast SEO

    Yoast SEO remains a popular choice among WordPress users due to its comprehensive features and user-friendly interface. It allows you to optimize your content for targeted keywords, manage meta descriptions, and generate XML sitemaps effortlessly. Its built-in readability analysis provides real-time feedback, helping writers improve their content quality, which is increasingly important in today’s SEO landscape where user experience is prioritized.

    One thing Yoast still does well: it nudges non-SEO people into decent habits. If you’ve ever tried to get a team of writers to consistently use one H1, write a sane meta description, and avoid publishing “Untitled Draft” pages (yes, I’ve seen it), Yoast’s checks catch a lot of that before it leaks into production.

    That said, Yoast can feel heavy if you enable every bell and whistle. So, if you’re chasing performance, I’d keep the feature set tight—sitemaps, titles/metas, basic schema—and turn off anything you don’t actively use. Fewer moving parts means fewer surprises after updates.

    Key Features:

    • Real-time content analysis and readability scores
    • Automatic XML sitemap generation
    • Easy integration with social media
    • Premium features for advanced SEO tasks

    You can learn more about Yoast SEO here.

    2. Rank Math

    Emerging as a strong competitor, Rank Math offers advanced SEO features within a single plugin. It supports multiple keyword targeting and provides detailed insights into your website’s performance. With its user-friendly setup wizard, Rank Math makes it easy for beginners to configure essential settings. AI integration further enhances its functionality, allowing for accurate keyword suggestions and content optimization.

    Rank Math is the plugin I reach for when I know the site will need more “SEO knobs” later—schema variations, granular controls, and lots of little toggles. Because you get so much in one plugin, you can avoid stacking three separate add-ons that all want to inject their own schema (and then you’re debugging why Google sees conflicting markup).

    Still, it’s easy to over-configure. I’ve watched site owners turn on every module on day one, then wonder why the admin feels sluggish and the UI is cluttered. Start with the setup wizard, enable only what matches your roadmap (local, Woo, schema), then revisit in a month when you have real data from Search Console.

    Key Features:

    • Supports up to 5 focus keywords
    • Built-in SEO audit tool
    • Rich snippets support
      n- Integration with Google Schema Markup

    For more information, check out Rank Math’s features here.

    3. All in One SEO Pack (AIOSEO)

    AIOSEO offers a robust alternative for those looking for an all-in-one solution. It features an easy-to-use interface with advanced options for experienced users. AIOSEO enables users to leverage various SEO techniques, including social media integration and performance analytics, which are crucial for monitoring your site’s search engine visibility.

    AIOSEO tends to work well for business sites where you want predictable defaults, a guided setup, and fewer “SEO philosophy” arguments inside the team. It’s also friendly when you’re handing a site off to a client later—settings are discoverable, and you don’t need a week of training just to change how titles render.

    One practical win: when you’re doing a content refresh project, the combination of audits + metadata controls helps you move fast without breaking structure. I’ve used it on sites with hundreds of legacy pages where the main job was cleaning titles, improving descriptions, and tightening index/noindex rules so thin pages stop soaking up crawl budget.

    Key Features:

    • Comprehensive SEO audit tools
    • Support for local SEO
    • Advanced schema support
    • WooCommerce support for e-commerce sites

    Discover AIOSEO here.

    4. SEOPress

    SEOPress is an ad-free SEO plugin loved for its simplicity and effectiveness. It provides users with powerful features that rival premium plugins without the cost. The plugin includes content analysis, social media optimization, and Google Analytics integration, making it a great choice for budget-conscious site owners.

    I’m biased toward tools that stay out of your way, and SEOPress usually does. No constant upsells, no loud UI, just the settings you need. That matters more than people think, because SEO is already a long game—if your plugin annoys you, you’ll avoid using it, and then you’re back to publishing pages with missing metadata.

    A real-world note: SEOPress is also handy when you’re trying to keep admin clean for non-technical editors. Fewer distractions means fewer accidental changes. If you’ve ever had someone toggle “Discourage search engines” (yep) you’ll appreciate calm interfaces.

    Key Features:

    • No ads
    • Unlimited keywords
    • Google Analytics integration
    • Built-in content analysis

    Learn more about SEOPress here.

    5. The SEO Framework

    This lightweight plugin, The SEO Framework, is designed for users who want a straightforward SEO tool without unnecessary complexity. Its use of AI helps automate SEO tasks, ensuring that your website remains optimized as you make changes. This makes it a solid option for those looking to keep their site lean and fast.

    If your top priority is speed and stability, this one belongs on your shortlist. The SEO Framework is for people who don’t want an “SEO suite,” they want sane technical SEO defaults that don’t bloat the site. So, if you’re already handling keyword research and content strategy elsewhere, a lightweight plugin is often the right call.

    I’ve seen it shine on sites that run a lot of other heavy plugins (page builders, LMS, membership). In those stacks, every extra dashboard widget and analysis panel adds friction. Keeping SEO boring and automatic is sometimes the smartest move.

    Key Features:

    • Automatic SEO settings based on your content
    • Local SEO support
    • Performance-focused design
    • Excellent support for developers

    Find out more about The SEO Framework here.

    6. Squirrly SEO

    Ideal for content marketers and bloggers, Squirrly SEO is built to assist users in creating SEO-friendly content. It uses its own AI to suggest keywords and provide relevant insights, making it easier for users to optimize their articles without extensive SEO knowledge.

    Squirrly is most useful when you’re publishing frequently and want coaching inside the editor. Think: small teams, solo bloggers, or marketing folks who don’t live in Ahrefs/SEMrush all day. Because it’s guidance-heavy, it can replace a chunk of “I guess this is fine?” uncertainty.

    But you still have to apply judgment. AI suggestions can push you toward safe, generic phrasing, and that’s how content starts to sound the same across the internet. I’ve had better results treating its recommendations like guardrails—fix the obvious issues (missing H2s, weak intro, no internal links), then write like a human.

    Key Features:

    • Real-time SEO assistance
    • Content reports and suggestions
    • Keyword research tools
    • Integration with Google Search Console

    Explore Squirrly SEO here.

    7. SmartCrawl

    SmartCrawl is a robust plugin that offers essential SEO features while focusing on performance. It comes with a built-in feature set that simplifies tasks like creating sitemaps and optimizing your content for search engines. Its intuitive interface makes it easy to handle SEO tasks regularly.

    SmartCrawl is a good fit if you want solid fundamentals without the feeling that you’re piloting a spaceship. It covers the recurring chores—sitemaps, basic on-page checks, redirects—so you can keep momentum during site iterations.

    I especially like having 404 monitoring + redirection in the same orbit as SEO settings, because content teams break URLs constantly. A common scenario: someone updates a slug “to be clearer,” then backlinks and internal links start bleeding. Catching that quickly prevents slow ranking decay that’s annoying to diagnose later.

    Key Features:

    • Automated SEO suggestions
    • Speed optimization features
    • Comprehensive sitemap generation
    • 404 monitoring and redirection tools

    You can learn more about SmartCrawl here.

    8. WP Meta SEO

    For those specifically looking for metadata management, WP Meta SEO excels. It allows users to batch edit meta information, making it a time-saving tool for larger websites. The plugin also includes tools for tracking SEO metrics, ensuring that users can monitor their optimization efforts easily.

    Bulk editing is the real story here. When you inherit a site with 300 posts where half the titles are duplicated and the meta descriptions are either blank or auto-generated junk, bulk tools save days. I’ve done the slow manual approach before; it’s miserable, and it’s also how you end up with inconsistent conventions.

    WP Meta SEO makes it easier to implement a rule like: “Product pages get this title pattern, blog posts get that one, and category pages are noindex.” Then, as you audit Search Console, you can tighten the pieces that actually matter instead of playing whack-a-mole in individual editors.

    Key Features:

    • Manage metadata in bulk
    • SEO analysis tools
    • Integration with Google Analytics
    • Internal linking suggestions

    Find out more about WP Meta SEO here.

    9. Premium SEO Pack

    The Premium SEO Pack combines various SEO features into a comprehensive package. It’s suitable for both beginners and advanced users, offering tools for link management, performance audits, and social media integration. This plugin is ideal for those looking to manage SEO across multiple platforms.

    Premium SEO Pack is for the “I need a toolbox” crowd. If you’re running multiple properties, or you’re doing ongoing audits for clients, having link tools and analysis sitting right in WordPress can speed up routine checks.

    The tradeoff is complexity. More modules means more settings, and more settings means more chances to configure something twice (or worse, conflict with caching/minification plugins). So, if you go this route, document what you turn on and why. Future-you will thank you when you’re troubleshooting after a theme change.

    Key Features:

    • Complete link management tools
    • Unique SEO audit techniques
    • Social media analysis
    • Customizable features to enhance user experience

    Explore the Premium SEO Pack further here.

    10. SEO Ultimate

    Finally, SEO Ultimate rounds out our list by providing a mix of features that cover on-page SEO and content optimization. It’s particularly beneficial for users who want to gain insights into their SEO performance without needing a deep knowledge of SEO principles.

    SEO Ultimate can be a practical choice when you want straightforward controls without committing to a bigger ecosystem. For smaller sites, that’s often enough—clean titles, canonicalization, and basic snippet enhancements.

    One caution, though: whichever plugin you pick, avoid running two SEO plugins at the same time “just to test.” I’ve seen sites output double canonicals, messy schema, and conflicting robots directives because someone forgot to fully disable the old one. So, if you migrate, do it deliberately: export settings if possible, switch, then crawl a handful of key pages to confirm what’s being output.

    Key Features:

    • SEO analysis and suggestions
    • Title tag management
    • Canonicalization tools
    • Ability to create rich snippets

    You can check out SEO Ultimate here.


    These ten plugins represent the best tools available for search engine optimization in WordPress in 2026. Each offers unique features suited for different needs, ensuring that you can find the right fit for your website. But don’t overthink the list—pick one primary SEO plugin, configure it cleanly, and then measure results in Search Console over the next 30–60 days.

    If you’re stuck choosing, here’s my opinionated filter: content-heavy site with multiple authors usually benefits from stronger on-page guidance (Yoast, Squirrly). A performance-sensitive build with a complex plugin stack tends to do better with lighter, quieter tooling (The SEO Framework, SEOPress). For schema-heavy businesses and WooCommerce, I lean toward feature-rich suites (Rank Math, AIOSEO), because duct-taping schema plugins later gets messy fast.

    For more insights on the essential tools for WordPress users this year, consider checking out our guides on Best SEO Tools for WordPress in 2026 and Top WordPress CMS Integrations for 2026.

    Also, don’t ignore the unsexy part: security and SEO are tied together. If your site gets hacked and starts serving spam pages, rankings can crater overnight, and cleanup takes forever. Pair your SEO setup with a solid security baseline—start here: Best WordPress Security Plugins for 2026.

    Pick your plugin, set your defaults (titles, index rules, schema), and publish one genuinely better page this week. That’s the move.

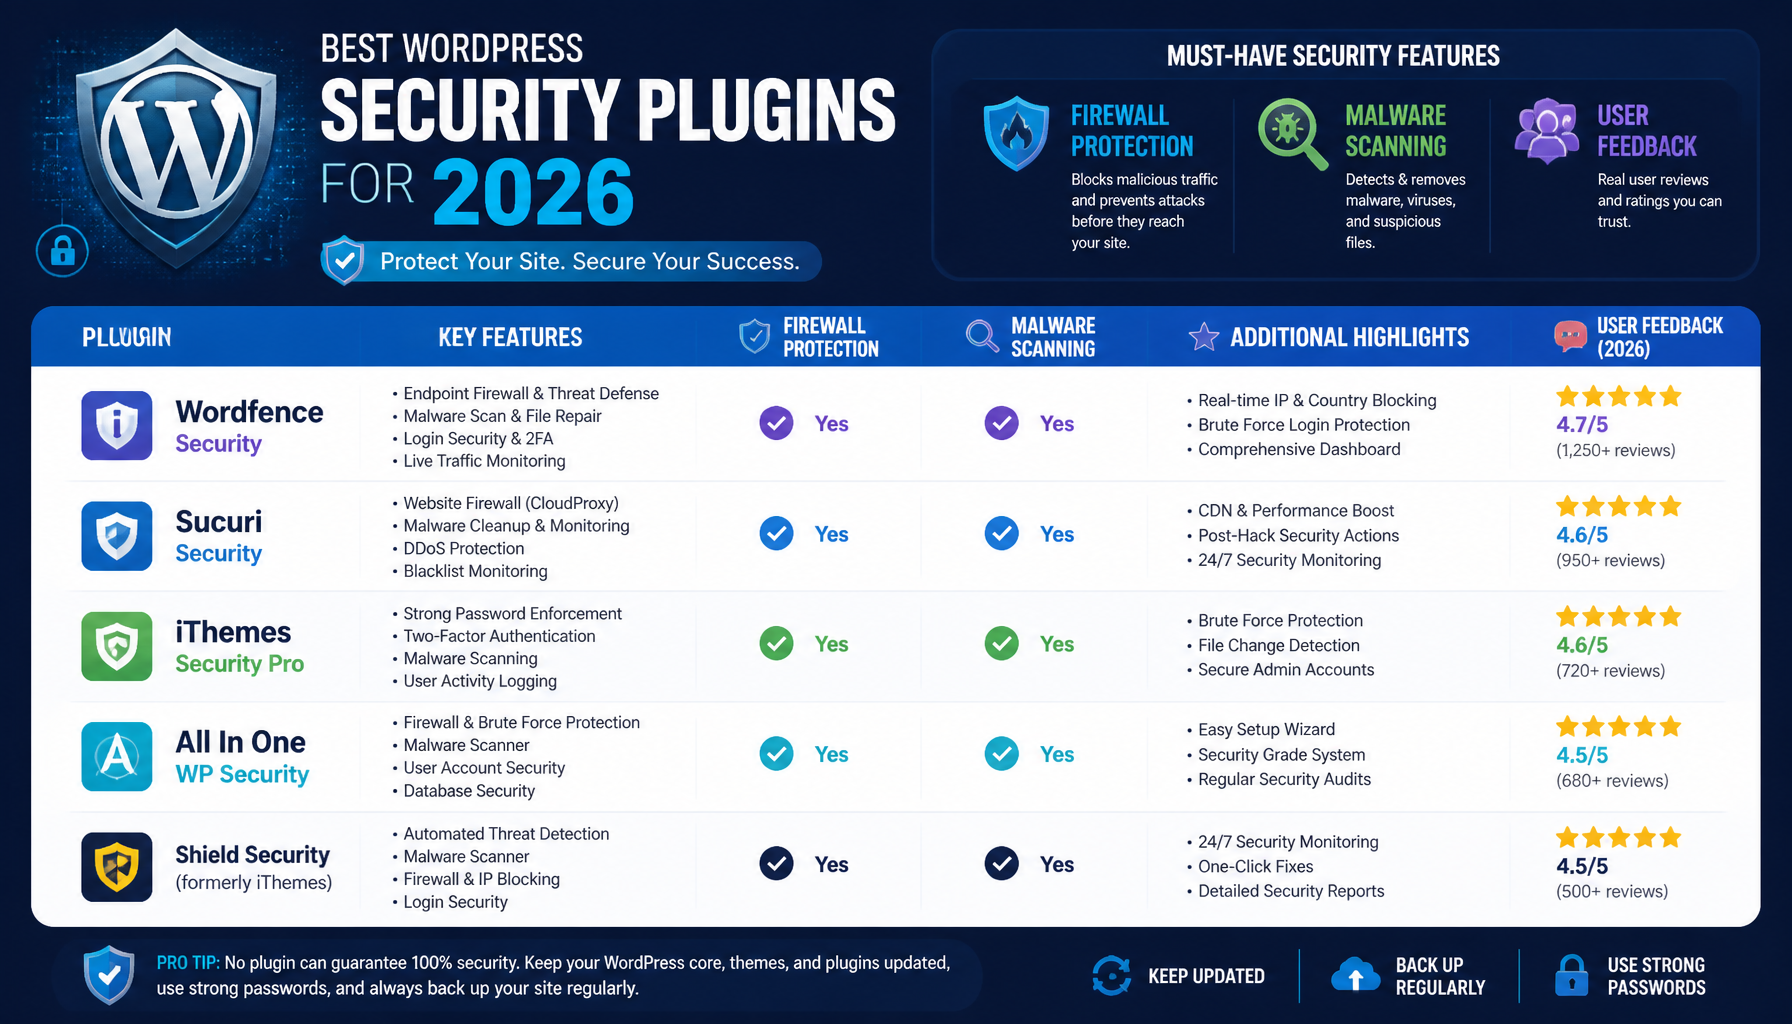
  • Top Malware Removal Tools for WordPress 2026

    Explore the best malware removal tools for WordPress in 2026, including free options and essential plugins.

    Featured image for Top Malware Removal Tools for WordPress in 2026

    Top Malware Removal Tools for WordPress in 2026

    When it comes to safeguarding a WordPress site from malware, choosing the right tools is essential. The landscape of malware threats keeps shifting, so the “best” tool depends on what you’re dealing with—an active infection, a prevention setup, or a dev workflow where you want vulnerability visibility.

    I’m opinionated about this: for most site owners, the best tool is the one you’ll actually keep running, keep updated, and understand well enough to react fast. Fancy dashboards don’t help if the cleanup process is confusing or the alerts are noisy.

    That said, here are the top malware removal tools for WordPress in 2026, plus the real-world reasons you’d pick each.

    1. Wordfence: The Leading Choice

    Wordfence is still the default recommendation for a lot of WordPress folks because it covers the basics well: scanning, firewalling, login protection, and visibility into what’s changing on the site.

    Where Wordfence shines is day-to-day defense. You install it, tune a few settings, and you get immediate value—especially if you manage multiple small to mid-sized sites and need a consistent baseline.

    In 2025, Wordfence reported that over 325,000 WordPress sites were infected with malware each day, which is a big, ugly reminder that “it won’t happen to me” is not a strategy. The plugin’s ability to block over 99% of automated attacks is also why I like it for brute-force and bot noise.

    My practical take: Wordfence is great when you want a single plugin to cover the common stuff. But you still need decent hosting, timely updates, and a plan for what happens when the site is already compromised.

    2. MalCare: Intelligent Malware Removal

    Another top contender, MalCare, stands out because it leans hard into fast, guided cleanup. If you’ve ever tried to manually remove malware from a WordPress install (and then discovered a second backdoor 24 hours later), you’ll understand why that matters.

    Unlike a lot of scanners that basically say “good luck,” MalCare pushes you toward removal workflows that don’t require you to be a security engineer. That’s useful when the person responsible is a marketer, a founder, or a busy dev who just needs the site clean now.

    An added advantage is its fast scanning speed; in many cases, it can clean an infected site in under 60 seconds. That speed isn’t just convenience—downtime can wreck SEO, break checkout flows, and tank conversion rates.

    Tradeoff: fast cleanup tools are only as good as your follow-up. If you clean the malware but don’t fix the original entry point (nulled plugin, outdated theme, leaked admin password), you’re going to get reinfected.

    3. Sucuri: A Comprehensive Security Suite

    Sucuri is the “I want a security company in the loop” option. It has a free scanner, but the bigger value is the premium service: firewall, monitoring, and a cleanup process that’s closer to managed response than a DIY plugin.

    If you run a business site where reputation matters—local services, SaaS marketing, ecommerce—Sucuri’s firewall is often the difference between “attack traffic hits me” and “attack traffic dies at the edge.”

    In a recent study, it was found that 60-80% of modern malware threats are missed by traditional security measures. That’s exactly why I like putting a cloud-based firewall in front of sites that can’t afford surprises.

    My caution here: don’t treat a firewall as magic. You still need updates, least-privilege access, and clean admin habits, because attackers love stealing credentials and walking in like they own the place.

    4. CleanTalk: User-Friendly and Effective

    For people who want something simple, CleanTalk keeps things straightforward. It’s commonly thought of as anti-spam first, but it also helps with blocking malicious behavior and reducing the garbage traffic that often comes with brute-force attempts and scripted abuse.

    This matters because noisy sites are hard to secure. If your logs are full of junk, you miss the one request that actually matters. So while CleanTalk isn’t the “deep forensic cleanup” tool on this list, it can lower the overall pressure on your site.

    I’ve seen it work well on community sites and blogs where comment spam and form abuse are constant. Less noise, fewer weird injections, fewer “why is my CPU pegged?” moments.

    5. iThemes Security: Holistic Protection

    iThemes Security focuses on hardening—locking doors, improving visibility, and reducing dumb risks. It’s not only about malware removal; it’s about stopping the easy wins attackers love.

    It includes brute force protection, file change detection, and security logs. Those features don’t sound exciting, but they’re the stuff that actually helps you answer: “What changed, when did it change, and who triggered it?”

    I like iThemes when a site has multiple admins or editors and you need accountability. Meanwhile, if you’re already running another firewall or scanner, make sure features don’t overlap in a way that creates conflicts (double rate-limiting can get weird fast).

    6. WPScan: Evaluating Vulnerabilities

    Finally, WPScan is a developer’s friend. It’s less “click to clean” and more “show me what’s risky in this stack.” It’s especially useful in maintenance workflows, pre-launch checks, and agency environments.

    WPScan’s vulnerability database and scanning approach helps you identify weak points—old plugins, exposed versions, and known issues that you can fix before they turn into a real incident.

    My rule: vulnerability scanning doesn’t replace malware scanning. It complements it. I’ve seen “clean” sites that were one outdated plugin away from being owned, and I’ve also seen “secure” configs that still got infected because credentials were reused.

    Understanding WordPress Malware and Security Risks

    If you want to fight malware, you need a realistic mental model of how WordPress sites get hit. Most infections aren’t movie-style hacking. They’re automation, sloppy credentials, or neglected updates.

    Also, the initial compromise often isn’t the end. Attackers aim for persistence—backdoors, admin users you didn’t create, scheduled tasks that reinfect, or injected code that only triggers for certain user agents.

    Recent statistics indicate a 42% increase in identified vulnerabilities over the past year alone. That’s why “I updated last month” can still be dangerously out of date—especially if you run a stack with 20+ plugins.

    Common Vulnerabilities and Entry Points

    WordPress sites can fall prey to various vulnerabilities, including:
    Outdated Plugins and Themes: Many hacks originate from plugins or themes that have not been updated. Attackers scan the internet for known vulnerable versions, so once an exploit is public, it’s basically a race.
    Weak Passwords: A significant number of hacks start with bad passwords or reused credentials. So even if the code is perfect, a leaked password from some other service can sink you.
    Configuration Gaps: Default settings can leave sites exposed. For example, overly permissive file permissions or too many admin accounts tend to come back to bite.

    One mistake I see constantly: people “secure WordPress” but skip the hosting layer. If your server is outdated, or your file ownership is wrong, or you’re letting anyone write to plugin directories, malware removal becomes a loop.

    The Evolution of Malware Threats

    The landscape for WordPress malware is evolving quickly. Attackers are now using AI-generated code and more evasive techniques—stuff that blends in, hides in must-use plugins, or piggybacks on legitimate files.

    For instance, a recent study found that AI-generated malware can mimic legitimate code so well that it often goes undetected by standard security plugins. In practice, that means signature-only scanning is less reliable than it used to be.

    So what works? Layering. You want scanning, a firewall (plugin or edge), strong auth, plus basic hygiene like updates and backups. It’s not glamorous, but it’s what holds up.

    Statistics and Trends for 2026

    As we progress into 2026, a few trends show up repeatedly:
    Increased Attack Frequency: Attacks are more frequent and more targeted, so “set it and forget it” security doesn’t hold.
    Rising Malware Complexity: Malware is more complex—backdoors, delayed execution, conditional redirects, and reinfection mechanisms.
    Growing Importance of Security Plugins: Given the rise in threats, reliable security plugins are now essential for every WordPress website.

    Because of those trends, I recommend integrating regular security audits into your maintenance routine. A performance-focused audit can still reveal security red flags (weird PHP execution, strange cron jobs, unexpected outbound requests), and the process in this guide on uncovering hidden performance issues maps nicely to real security triage.

    My Experience With This

    I’m Mobeen Abdullah, and as the founder of Revnix, I spend a lot of time in the intersection of cloud-native platforms and security. That’s a fancy way of saying I’ve seen what happens when a WordPress site gets infected on a Friday night and nobody has a clean rollback.

    Here’s a real pattern I’ve dealt with more than once: a site owner notices a ranking drop first, not malware. Search Console starts throwing “This site may be hacked” warnings, paid ads get disapproved, and revenue gets weirdly soft. When we look, the homepage is fine—until you visit from a mobile user-agent, or you land on a long-tail blog URL. Then you get redirected to a spam domain. That’s not random. Attackers do it on purpose because it delays detection.

    When I’m cleaning a hacked WordPress site, I follow a boring checklist. Boring is good.

    How I actually approach a cleanup

    1) Put the site in a safe state. I’ll temporarily restrict access (maintenance mode, basic auth, or a WAF “under attack” style mode) so the infection doesn’t keep spreading while I’m working.

    2) Take a snapshot backup anyway. Even if the site is infected, I archive the current state. That’s how I compare files later and figure out what changed. It’s also how I prove what happened if a client asks.

    3) Scan with at least two angles. I’ll use a plugin scanner (Wordfence/MalCare style) and then I’ll sanity-check the filesystem and database. Why? Because I’ve seen clean scans miss a malicious mu-plugin, and I’ve seen database injections hide in options tables.

    4) Remove the malware—and the persistence. Cleaning visible payloads is easy. The hard part is finding the reinfection path: rogue admin users, injected cron events, backdoored plugins, or writable directories that shouldn’t be writable.

    5) Patch the entry point. If the infection came from an outdated plugin, you update or replace it. If it came from stolen credentials, you rotate passwords, force logout sessions, and tighten roles.

    6) Harden and monitor. This is where tools like Sucuri firewall, Wordfence rules, iThemes hardening, and WPScan checks become the ongoing guardrails instead of a one-time cleanup.

    Common mistakes I see (and why they hurt)

    • Only deleting “suspicious” files. Attackers love naming files like normal WordPress files. If you delete one wp-vcd.php but miss the injected code in functions.php, you’ll be back here tomorrow.

    • Restoring a backup without fixing the vulnerability. A restore is not a fix. If the vulnerable plugin stays, the attacker just walks back in.

    • Keeping too many admins. Every extra admin is another set of credentials that can leak. Reduce it. Then document who owns what.

    • Ignoring hosting-level signals. If your host is logging outbound spam, or your CPU spikes at odd hours, don’t shrug. Those are often the first breadcrumbs.

    A quick persona story (because this is common)

    One client—a small ecommerce shop—installed a “free premium theme” from a random site. It worked great for two weeks. Then checkout started failing intermittently, and their customers got redirected to a sketchy pharmacy page on mobile.

    We cleaned it, but the real fix was replacing the theme, rotating every credential (WP admin, hosting panel, database, SFTP), and putting a firewall in front. After that, we added a monthly WPScan-style vulnerability review and a weekly file change report. The site stayed stable because the process stayed boring.

    If you take one thing from my experience: malware removal isn’t a plugin you install once. It’s a loop—detect, clean, patch, harden, monitor. The tools make the loop faster, but you still have to run it.

    Conclusion

    As we move through 2026, the security of WordPress sites remains a daily operational concern, not a once-a-year project. Effective malware removal tools, paired with proactive habits, will reduce the risk from increasingly evasive malware.

    If you want to keep the site fast while staying secure, start tightening your maintenance routine. For performance and stability work that pairs nicely with security, read maximizing efficiency with WordPress and fold those checks into your monthly schedule.

    Also, if you’re exploring architecture changes, headless WordPress can reduce some attack surface and improve performance—although it introduces its own complexity. Either way, pick your tools, set a cadence, and don’t wait for the next infection to take security seriously.

  • Best WordPress Security Plugin 2026

    Best WordPress Security Plugin 2026

    Learn how to choose the best WordPress security plugin in 2026 to protect your site from threats.

    Featured image for How to Choose the Best WordPress Security Plugin in 2026

    How to Choose the Best WordPress Security Plugins in 2026

    When it comes to wordpress security, choosing a plugin can feel like picking a lock at a hardware store—everything claims to be “high security,” and then you read reviews and get more confused.

    WordPress powers a huge chunk of the web, so attackers don’t need to “target you personally.” They just spray-and-pray across thousands of sites until something sticks. So in 2026, the best WordPress security plugin isn’t the one with the longest feature list. It’s the one you’ll configure correctly, keep enabled, and understand well enough to trust.

    Key Features to Look For

    Malware scanning that’s usable

    “Scanning” is table stakes. What matters is how it scans and what happens next.

    Look for real-time or frequent scans, clear reporting (what file, what signature, what behavior), and a safe remediation path. I’m biased toward tools that can quarantine or roll back changes instead of deleting files blindly.

    A quick way to sanity-check a scanner: does it catch the common junk—base64 blobs injected into wp-options, weird cron jobs, and modified index.php/wp-config.php patterns? If the report is just “malware found” with no detail, you’ll still be stuck.

    Common mistake: people run a scan once, see “0 issues,” and assume they’re done. But new plugins get installed, themes get updated, credentials leak—so the scan needs to be ongoing.

    Firewall protection (and where it runs)

    A Web Application Firewall (WAF) helps block bad requests before they do damage. But not all firewalls are equal.

    Plugin-level firewalls run inside WordPress/PHP. They can help, but they still require WordPress to load far enough to execute rules. Cloud/WAF-at-the-edge options can stop a lot of nonsense before your server spends CPU on it.

    Tradeoff: cloud WAFs can be more effective, but you’ll deal with DNS changes, caching quirks, and the occasional false positive that blocks a legit checkout.

    Login security that matches your reality

    Two-factor authentication (2FA) is great—until you force it on a client who loses their phone, can’t find backup codes, and calls you at 11pm.

    So yes, prefer plugins with 2FA, login attempt limiting, and alerts. But also check whether they support:

    • role-based enforcement (admins require 2FA, authors optional)
    • recovery codes
    • trusted device windows
    • reCAPTCHA or similar challenges (careful—can annoy real users)

    Common mistake: enabling 2FA without documenting recovery steps. The attacker isn’t always the one who gets locked out.

    Backups: either included or tightly integrated

    Some security plugins include backups. Many don’t—and that’s fine.

    What’s not fine is having “security” and “backups” live in separate worlds where nobody knows the restore process. In real incidents, restore time is the difference between a contained mess and a public meltdown.

    If your security plugin doesn’t do backups, I still want it to:

    • warn on file changes
    • make it easy to export logs
    • play nicely with your backup tool (no giant cache directories exploding backup size)

    A UI you’ll actually use

    This is more important than people admit.

    If a plugin has 90 toggles and you don’t know what half of them do, you’ll either misconfigure it or disable it. I’d rather see a plugin with a clean “baseline hardening” mode and a few advanced controls than a cockpit full of mystery switches.

    A practical selection process (the part most people skip)

    Here’s the decision flow I use when I’m helping a small business site or a content-heavy blog.

    Step 1: Define what you’re protecting

    Ask two questions:

    1. If the site goes down for a day, what does it cost you?
    2. If the site gets defaced or starts redirecting to spam, how bad is the reputation hit?

    If you run WooCommerce, take bookings, or collect leads, you’re not in the “basic” bucket anymore. Even if your traffic is small.

    Step 2: Check your hosting and stack first

    Before you buy a plugin, look at your foundation.

    If your host already provides a WAF, malware cleanup, and daily backups, you might only need login hardening + monitoring. On the flip side, if you’re on cheap shared hosting with no isolation, a plugin can’t magically fix neighbor-site infections.

    Step 3: Install one plugin and configure it fully

    A pile of half-configured security plugins is how you get:

    • duplicate firewalls fighting each other
    • admin lockouts
    • broken REST API or XML-RPC behavior
    • performance slowdowns that make you blame WordPress itself

    Pick one, do it properly, then add supporting tools only if there’s a clear gap.

    Step 4: Test the boring stuff

    I always do a quick “does it behave?” pass:

    • Can I log in normally?
    • Do password resets work?
    • Does the contact form still submit?
    • Does checkout still complete?
    • Do scheduled posts still publish?

    Security that breaks the business isn’t security—it’s self-sabotage.

    Popular Security Plugins in 2026

    No plugin is perfect. Each one has a personality, and you’ll feel it after a month.

    Wordfence

    Wordfence is popular for a reason: the free tier is genuinely useful, and it covers a lot of ground—firewall + scanner + alerts.

    Where I’ve seen it shine: small business sites with a single admin who wants visibility. The email alerts can be noisy at first, but once you tune them, they’re a solid early-warning system.

    Where people trip up: they enable everything, then wonder why the site feels slower. Be selective with real-time features on weak hosting.

    Sucuri

    Sucuri is often a better fit when you want a strong cloud firewall without turning your WordPress dashboard into a security console.

    The big win is stopping junk traffic before it hits your origin server. That can be the difference between “site is fine” and “server is pegged at 100% CPU.”

    Tradeoff: you’ll spend time on DNS and caching rules. It’s not hard, but it’s also not a one-click magic wand.

    iThemes Security

    iThemes is focused on WordPress hardening—changing defaults, enforcing rules, monitoring changes.

    It’s useful when your biggest risk is admin hygiene (weak passwords, too many users, outdated plugins). File change detection can also catch “something weird happened last night” events.

    Common mistake: people turn on aggressive hardening without understanding their stack, then break API integrations or editor workflows.

    All In One WP Security & Firewall

    This one is beginner-friendly and packaged nicely.

    I like it for small, brochure-style sites where the priority is tightening the basics without a steep learning curve. The interface walks you through improvements, which is a nice touch.

    Just don’t confuse “lots of green checkmarks” with “invincible.” You still need updates, decent hosting, and sane user access.

    MalCare

    MalCare’s strength is cleanup. That matters because detection alone doesn’t pay the bills when a site is already compromised.

    I’ve seen too many site owners learn the hard way that removing malware manually is tedious: you clean one file, it comes back through a backdoor you missed. A tool that handles cleanup confidently can save you days.

    Free WordPress Security Plugins 2026

    Free can be totally fine—if you understand the limits.

    Wordfence Free

    Good baseline scanning and firewall features. It’s often the first thing I install on a low-budget site.

    The catch is response speed and advanced capabilities compared to paid tiers. Still, if you configure it and keep it updated, it beats “nothing.”

    All In One WP Security

    Also a strong free option, especially for beginners who want guided improvements.

    If you’re using it, spend 20 minutes reading what each toggle actually does. Otherwise you’ll end up with weird side effects and no clue why.

    WPScan

    WPScan is useful because it checks known vulnerabilities against what you’re running.

    It’s not the same as malware cleanup. Think of it as “inventory and exposure checking.” If it tells you a plugin version is vulnerable, your next step is patching or replacing that plugin—not staring at the report.

    Understanding WordPress Security Features and Relevance

    WordPress security isn’t one feature. It’s a chain—and plugins are only one link in it.

    If you get this section right, you’ll stop shopping for a “miracle plugin” and start building a setup that actually holds up when your site gets poked (because it will).

    Is WordPress Still Relevant in 2026?

    Yes, and the numbers back it up. As of mid-2026, WordPress still powers 41.2% of all websites. That scale is exactly why it stays relevant: endless themes, plugins, and a talent pool that isn’t going away.

    But that same scale makes it a big target. Attackers don’t need a grudge against your bakery site or your portfolio. They run automation that hunts for:

    • outdated plugins with known holes
    • exposed admin panels
    • weak passwords reused from other breaches
    • insecure hosting setups

    A quick real-world example I’ve dealt with: a small services business had a “set-and-forget” WordPress site for two years. Traffic was modest, so they assumed nobody cared. Then one day their homepage started redirecting to a fake “mobile prize” page—but only on phones. Desktop looked normal, which is why it went unnoticed.

    How did it happen? A stale plugin with a known vulnerability, plus an admin password that had shown up in a previous credential dump. Nothing exotic.

    What fixed it wasn’t one magical tool. We had to:

    1. put the site behind a firewall
    2. remove the injected code and backdoor
    3. rotate all credentials (WordPress, hosting, FTP/SSH, database)
    4. update and replace the vulnerable plugin
    5. add monitoring so the next change triggers an alert

    WordPress is still relevant. You just can’t run it like it’s 2014.

    Does WordPress Have Built-In Security?

    It does, and it’s better than people give it credit for. WordPress includes core security practices like user roles/capabilities, authentication cookies, nonces for request validation, and a steady update cadence.

    So why do sites still get popped?

    Because built-in security mostly assumes you’re doing the basics right:

    • you update core, themes, and plugins quickly
    • you run strong passwords (and ideally 2FA)
    • you don’t install abandoned plugins
    • you limit who has admin access
    • your hosting environment is configured safely

    Security plugins extend WordPress where real-world site owners struggle: monitoring, hardening defaults, blocking brute force attempts, and giving you a paper trail when something changes.

    Here’s a step-by-step baseline I recommend (even on “simple” sites):

    1. Lock down admin accounts: remove old admins, enforce strong passwords, enable 2FA where it won’t break workflows.
    2. Reduce the attack surface: disable what you don’t use (XML-RPC if it’s not needed, old plugins, unused themes).
    3. Add detection: file integrity checks, malware scans, and alerts that go to an inbox you actually read.
    4. Block the obvious garbage: rate limiting on login, WAF rules, bot protection.
    5. Plan the restore: make sure you can restore in under an hour, not “someday.”

    Common mistakes I see constantly:

    • Installing two security plugins “for extra protection,” then getting locked out or breaking the editor.
    • Treating alerts as spam. The first alert is usually the gift.
    • Forgetting staging sites. Attackers love forgotten subdomains with old WordPress installs.

    How security plugins fit in (and where they don’t)

    A security plugin can’t compensate for reckless plugin choices or an unmanaged server. It can, however, make a well-run WordPress site much harder to mess with.

    If you’re deciding how much to rely on a plugin, use this mental model:

    • Plugin is great for: login defense, monitoring, basic WAF rules, malware scanning, audit logs, notifications.
    • Plugin is weak at: stopping upstream DDoS, fixing insecure hosting, protecting you from a compromised admin laptop.

    That’s not a knock on plugins—it’s just scope.

    Picking “top free” lists carefully

    I’ve seen plenty of “best plugin” listicles that are basically affiliate pages with screenshots. Some are useful, but you still need to match the recommendation to your situation.

    If you want a starting point for budget options, this roundup of top free WordPress security plugins in 2026 can help you shortlist. Then do your homework:

    • check last update date
    • read recent support threads
    • confirm it works with your PHP/WP versions
    • test on staging before production

    If you only do one thing after reading this: pick one security plugin, configure it with intention, and set a recurring reminder to review alerts and updates. That habit beats any “set-and-forget” setup.

  • Top Applications of Wiki LLMs

    Top Applications of Wiki LLMs

    Discover the top 5 applications of Wiki LLMs and how they transform knowledge management. Learn from Mobeen Abdullah, AI expert.

    Featured image for Top 5 Applications of Wiki LLMs You Need to Know About

    Understanding LLM Wiki and Its Applications

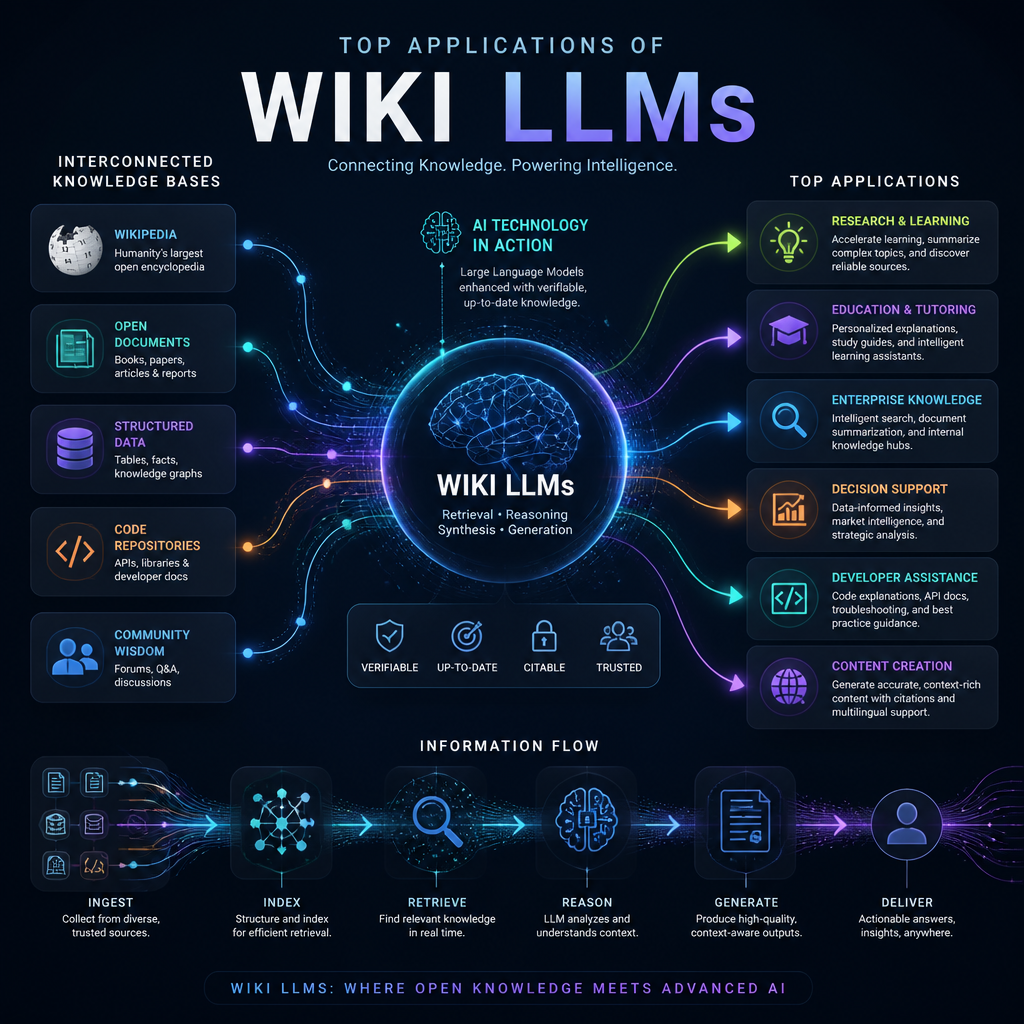
    An LLM Wiki (a framing that got a lot of attention via Andrej Karpathy) blends large language models with structured, editable knowledge. The point isn’t “chat over PDFs.” It’s creating a repository that improves over time — pages get refined, links between concepts get clearer, and gaps become obvious.

    A good mental model: RAG retrieves. A wiki accumulates. An LLM Wiki tries to do both, but with the wiki being the long-term memory you keep grooming.

    One practical application I’ve seen work well is taking thousands of scattered notes, docs, and research snippets and turning them into a navigable knowledge graph. The patterns in the Karpathy LLM Wiki are useful because they force you to think in “pages and connections,” not “search results.” In one real project, the first win wasn’t accuracy — it was discoverability. People stopped asking the same question in Slack because the answer lived on a stable page that kept getting better.

    If you want to get your hands dirty, the LLM Wiki GitHub repo is a solid starting point. I like it because it’s not pretending this is magic. You still need ingestion rules, review loops, and some discipline around what gets written back to the wiki.

    LLM Wiki vs RAG: Key Differences

    RAG is great when your source documents are already high quality and relatively stable. You embed text, retrieve top-k chunks, and generate an answer. That’s a clean pipeline, and it ships fast.

    But RAG can get weird as your corpus grows. Chunking breaks context, duplicates creep in, and different docs contradict each other. Then you’re stuck: do you “fix” the source docs, or just hope retrieval picks the right chunk? I’ve watched teams quietly add prompt band-aids for months because it’s cheaper than cleaning a messy knowledge base.

    LLM Wikis take the opposite stance: consolidate the knowledge into fewer, better artifacts. Instead of answering from a random pile of excerpts, you build canonical pages (“How auth works here,” “Pricing rules,” “Experiment methodology”) and keep tightening them.

    The tradeoff is obvious, though. Someone has to own those pages. In practice, I’ve had success with a lightweight workflow: the model drafts updates, a human reviewer approves them, and the wiki logs what changed. Without that loop, you’ll end up with confident-sounding nonsense that looks official.

    Educational settings are where this feels almost unfair. A student doesn’t need ten disconnected paragraphs from ten documents; they need one coherent explanation, plus links out to deeper pages. That coherence is exactly what a wiki structure enforces.

    Understanding the Meaning of LLM

    LLM stands for Large Language Model — a model trained to predict and generate text based on patterns in huge datasets. That sounds abstract, but the practical point is simple: it can summarize, rewrite, connect ideas, and answer questions in a way that feels conversational.

    Still, an LLM doesn’t “know” your organization’s truth by default. It knows language patterns. So, if you don’t anchor it to a governed knowledge base (documents, wiki pages, citations, review history), you get answers that may sound right while being subtly wrong.

    In other words: the LLM is the fluent interface. The wiki is the memory you can audit.

    As we get deeper into Wiki LLMs, that split matters. Every time I’ve seen these systems succeed, the team treated knowledge like software: versioned, reviewed, and maintained.

    Practical Applications of LLM Wikis

    1. Educational Resources: LLM Wikis let educators assemble material into a structured learning map instead of a folder dump. The nice part is the navigation: prerequisites can be explicit (“read this first”), and examples can be attached to the concept page that needs them.

    A simple scenario: a student working through linear algebra gets stuck on eigenvectors. In a normal LMS, they bounce between lecture slides, a textbook chapter, and maybe a forum post. In an LLM Wiki, the eigenvector page can include the definition, an intuition section, two worked examples, and links back to prerequisites (matrices, determinants). Because the content is centralized, you fix it once — everyone benefits.

    1. Corporate Knowledge Management: Enterprises lose time to tribal knowledge. I’m talking about onboarding docs that don’t match reality, runbooks that assume one specific environment, and “ask Jane” processes that don’t survive a vacation.

    With an LLM Wiki, you capture that institutional knowledge into canonical pages. Then you wire your support or internal assistant to answer from those pages. The big win isn’t just productivity; it’s consistency. When the answer changes (new pricing rule, new escalation path), you update one page instead of hoping every doc and slide deck gets updated too.

    1. Research Projects: Research is brutal on knowledge systems because everything changes weekly. Hypotheses evolve, definitions shift, and related work piles up fast.

    A wiki structure helps because it encourages stable “concept pages” and “paper pages.” I’ve seen teams use it to keep a living bibliography where each paper gets: a one-paragraph summary, key claims, weaknesses, and how it connects to the project. Then, when someone says “why are we not using method X?”, the answer is already linked and documented — not trapped in one person’s head.

    1. Developer Tools: For developers, LLM Wikis can become the “how we build software here” brain. Not just API docs, but the messy stuff: deployment quirks, common incident patterns, migration gotchas, and why a past decision was made.

    One mistake I’ve personally seen: a team auto-generated wiki pages from code comments and called it “documentation.” It looked impressive, yet it didn’t help anyone debug a production issue at 2 a.m. The fix was to treat the wiki like a runbook-first system: pages centered on workflows (deploy, rollback, rotate secrets), each with checks, commands, and failure modes. Then the LLM helped by proposing updates after incidents, while engineers approved the final wording.

    1. Content Generation: Writers and content teams can use an LLM Wiki as a source-of-truth for voice, product claims, and approved messaging — basically a guardrail against accidental contradictions.

    The practical flow is straightforward: keep pages for brand voice, product features, pricing, and “do not claim” rules. When you draft a new post, the model pulls from that curated wiki, not from whatever it remembers. That reduces rework. It also avoids the awkward situation where two different blog posts describe the same feature in two different ways.

    In my experience, the teams that get the most value don’t try to automate everything. They automate the boring parts (drafting, summarizing, linking) and keep humans in the loop for judgment calls.

    My Experience With This

    As the founder and CEO of Revnix, I’ve built cloud-native and AI systems where knowledge sprawl quietly becomes a tax on every team. When we introduced wiki-style LLM workflows, the early wins were surprisingly unglamorous: fewer repeated questions, faster onboarding, and less time spent hunting for “the latest doc.”

    One rollout lesson I’d emphasize: start with a narrow scope. Pick one area with frequent questions (onboarding, support troubleshooting, incident response), build 20–40 high-quality pages, and enforce ownership. After that, expand.

    If you skip ownership, the wiki becomes a graveyard. If you skip review, it becomes a rumor mill. But when you get those two right, you end up with something rare — a knowledge base that actually keeps up with the business.

    Conclusion

    Wiki LLMs aren’t a novelty. They’re a practical answer to a real problem: knowledge keeps changing, while most documentation systems assume it won’t.

    Across education, corporate knowledge management, research, developer documentation, and content workflows, the pattern is the same. Use the LLM to help you write and connect concepts, then use the wiki structure to make those concepts durable and auditable.

    If you’re considering adopting one, don’t start by asking “what model should we use?” Start by asking “who will own the pages, and how will updates get approved?” Get that right, and the tech part becomes much easier.

    Frequently Asked Questions

    1. What is a wiki LLM?
    A wiki LLM refers to a large language model that organizes and structures knowledge in a wiki format. It allows users to build, maintain, and query a dynamic knowledge base, which evolves over time.

    2. How does an LLM Wiki differ from traditional RAG systems?
    Unlike traditional Retrieval-Augmented Generation systems that pull documents for every query, an LLM Wiki creates a persistent knowledge base that can be accessed and updated incrementally, making it more efficient for users.

    3. What does LLM actually mean?
    LLM stands for Large Language Model, which refers to sophisticated AI models designed to understand and generate human-like text based on extensive linguistic data.

    4. Where can I find resources on LLM Wiki implementations?
    The LLM Wiki GitHub provides comprehensive resources and tools for developers interested in building LLM-driven wikis tailored to their needs.

    5. Can LLM Wikis be used for educational purposes?
    Absolutely! LLM Wikis can be tailored to create rich educational resources that help students access and interact with knowledge efficiently.

  • Top Free WordPress Security Plugins in 2026

    Top Free WordPress Security Plugins in 2026

    Discover the best free WordPress security plugins in 2026 that protect your site from attacks and vulnerabilities.

    Featured image for The Best Free WordPress Security Plugins for 2026

    The Best Free WordPress Security Plugins for 2026

    Most WordPress security problems aren’t Hollywood hacking scenes. They’re boring:

    • A plugin update gets delayed “until after the campaign.”
    • Someone reuses a password from an old breach.
    • The login page gets brute-forced all night.
    • A compromised admin account installs a sketchy plugin, and now you’re hosting a spam farm.

    A good free security plugin won’t make you invincible, but it will reduce your attack surface, catch obvious issues early, and give you a fighting chance when something goes sideways.

    Here are the free tools I actually see used in the wild, plus what I’d watch out for.

    1. Wordfence Security

    Wordfence is the “default pick” for a lot of site owners for a reason. The free version gives you a web application firewall (WAF), a malware scanner, and brute-force protection. It’s also one of the few plugins that makes you look at your traffic like an adult—you can see what’s hitting /wp-login.php, which IPs are being noisy, and what’s getting blocked.

    Where Wordfence shines (free tier):

    • WAF rules that block common exploit patterns
    • Malware scanning and file change detection
    • Login security controls (rate limiting, lockouts)
    • Visibility: live traffic, blocked requests, attack patterns

    Common mistake I keep seeing: people install Wordfence, feel safer, and then ignore the alerts. If you’re going to run it, you need to tune notifications so you don’t end up with inbox fatigue.

    How I configure it on a typical small business site:

    1. Turn on brute-force protection and set lockouts (don’t go extreme; you can lock out legit users).
    2. Disable XML-RPC if you don’t need it (a lot of sites don’t).
    3. Run an initial full scan, then schedule scans during off-hours.
    4. Check the “Live Traffic” view once a week for a month. After that, monthly is fine unless you’re under active attack.

    If you run WooCommerce or membership sites, be careful with aggressive blocking. I’ve seen stores block payment gateway callbacks and break checkouts—usually because someone flipped on strict rules without testing.

    2. Sucuri Security

    Sucuri Security is a solid “audit and integrity” tool. In practice, I like it when I want a simple security activity trail and file integrity monitoring without making the dashboard feel like a SOC.

    What it’s good at:

    • Security activity auditing (who did what, when)
    • File integrity monitoring (unexpected file changes)
    • Post-hack actions (useful if you’re recovering)

    Tradeoff: the plugin alone isn’t a magic shield. People confuse “scanner alerts” with “protection.” The alerts are still valuable because they push you to fix the root cause: outdated plugins/themes, suspicious file changes, or admin activity you don’t recognize.

    Mistake I’ve seen: site owners assume Sucuri will stop a brute-force attack by itself. You still need login protection (from Sucuri or another plugin) and decent hosting-level controls.

    3. iThemes Security

    iThemes Security packs a lot into one plugin: enforcing strong passwords, limiting login attempts, 2FA options, and general hardening.

    What it’s good for:

    • “Set it and forget it” hardening options
    • Strong password enforcement (huge, honestly)
    • Limiting login attempts and tightening admin behavior

    Where people trip: turning on every feature at once. I’ve watched teams enable aggressive file change detection + database tweaks + admin URL changes, and then forget what they changed. The next dev comes in, things don’t match documentation, and now you’ve got a mystery box.

    My approach: enable it in layers.

    • Start with password policy + login rate limiting
    • Add 2FA for admins and editors
    • Only then consider deeper hardening features

    4. All In One WP Security & Firewall

    This one is popular because it’s organized like a checklist—basic, intermediate, advanced—so non-security folks don’t feel lost.

    What it’s good at:

    • Login lockdown and brute-force protection
    • Basic firewall rules
    • IP blacklisting / whitelisting
    • A UI that encourages gradual improvement

    The tradeoff: “advanced” settings can cause real breakage if you don’t understand them. I’ve seen a site block legitimate RSS access and third-party integrations because someone toggled a rule without knowing what endpoint it affected.

    If you’re not sure, move one step at a time, test your contact forms, test checkout, test search, and check that your caching/CDN still behaves.

    5. MalCare Security

    MalCare’s big promise is simple: scan, detect, and help you clean up without burning a weekend. Even on the free side, it’s focused on malware detection and monitoring.

    Where it helps:

    • Malware scanning and alerts
    • Quick visibility into whether you have a real infection vs. “something feels off”

    Reality check: no scanner catches everything perfectly. You still need backups and an update routine. But a tool that spots infections early can be the difference between a 30-minute fix and a full “Google flagged my domain” nightmare.

    Importance of Free Security Plugins

    Free plugins aren’t “toy versions.” They usually cover the 80/20: stop the dumb automated stuff, warn you about risky changes, and give you controls that WordPress doesn’t ship with by default.

    But here’s the part people don’t like hearing: security plugins don’t replace basic hygiene.

    • Update WordPress core.
    • Update plugins/themes.
    • Remove what you don’t use.
    • Use real passwords and 2FA.
    • Keep clean backups.

    In 2026, it is reported that 13,000 WordPress sites are hacked daily due to outdated plugins and weak passwords, showcasing the critical need for proactive security measures (TechTide Solutions). If that number is even close to reality, it matches what I’ve seen firsthand: most compromises aren’t “zero-day genius.” They’re old vulnerabilities plus easy credentials.

    A practical “first hour” setup (what I’d do on a fresh install):

    1. Install one security plugin (don’t stack three WAFs).
    2. Turn on login protection (rate limiting + lockouts).
    3. Enable 2FA for admins.
    4. Run a full scan.
    5. Delete unused plugins/themes.
    6. Set a weekly update slot on your calendar.

    If you do just that, you’re already ahead of a lot of sites that get popped.

    Exploring WordPress SSO Solutions for Enhanced Security

    SSO isn’t about convenience. It’s about control.

    When you move logins to a central identity provider (Google Workspace, Microsoft Entra ID/Azure AD, Okta, etc.), you get a few things WordPress alone struggles with:

    • consistent 2FA enforcement
    • quick offboarding (disable one account, access dies everywhere)
    • fewer reused passwords floating around

    Yes, it makes login smoother. But the security win is that WordPress stops being the primary password vault for your team.

    MiniOrange SSO

    MiniOrange SSO is one of the more common WordPress SSO plugins because it supports multiple identity providers and different protocols depending on what you’re using (SAML, OAuth/OIDC).

    It can integrate with Google, Facebook, and Microsoft, which covers the reality for most small orgs: people already have those accounts.

    Benefits of SSO in WordPress Security

    1. Reduced Password Fatigue: Users are less likely to use weak or reused passwords since they only need to remember one.
    2. Streamlined Login Process: SSO allows for quicker access, improving user experience.
    3. Centralized User Management: Admins can manage user access more efficiently, monitoring who has access to what.

    I’ll add a fourth, because it’s the one that saves your skin during incidents:

    1. Faster containment: if you suspect an account is compromised, you kill the identity provider session and rotate credentials in one place.

    A real SSO scenario (where it helped)

    A team I worked with had a WordPress site with ~20 authors and editors. Turnover was normal—contractors, guest writers, marketing interns. The site didn’t get hacked through some exotic exploit. Someone left the company and their WordPress user never got removed. Months later, that same credential set worked (password reuse is undefeated), and suddenly new “admin” users appeared.

    Nothing fancy. Just neglected access.

    After switching to SSO tied to their Google Workspace:

    • offboarding became “disable Google account”
    • 2FA was enforced centrally
    • WordPress stopped storing the primary password people cared about

    That change didn’t solve every security problem, but it shut down a whole class of them.

    Step-by-step: how I roll out SSO safely

    SSO can absolutely lock you out if you rush it. Here’s the rollout order I trust:

    1. Create a break-glass admin account
    2. A separate WordPress admin with a long random password.
    3. Store it in a password manager.
    4. Do not use it day-to-day.

    5. Pick one identity provider

    6. If you’re already on Google Workspace or Microsoft, start there.
    7. Don’t add multiple IdPs “just in case” unless you have a real reason.

    8. Enable SSO for a pilot group

    9. Start with yourself and one other admin.
    10. Confirm you can log in, log out, and log back in.

    11. Map roles carefully

    12. Make sure an “employee” in the IdP doesn’t become an “administrator” in WordPress by default.
    13. Least privilege wins.

    14. Enforce 2FA at the identity provider

    15. This is the whole point. If you don’t enforce MFA/2FA, you’ve just moved passwords around.

    16. Roll out to editors/authors

    17. Communicate what’s changing.
    18. Expect questions like “why can’t I use my old login?”

    19. Disable WordPress password login (optionally)

    20. Only after you’ve proven SSO works.
    21. Keep the break-glass admin as your fallback.

    Common SSO mistakes (I’ve seen all of these)

    • No break-glass admin → one misconfig, and you’re locked out.
    • Role mapping too generous → users get admin when they shouldn’t.
    • Not enforcing 2FA in the IdP → you gain convenience, not security.
    • Ignoring service accounts → integrations still need access; plan them.

    As a CEO, I’ve dealt with countless security issues, and one of my biggest lessons learned is that managing user access is just as crucial as protecting the website itself. Implementing an SSO solution can drastically reduce potential entry points for attackers.

    Conclusion: Your Security Strategy Matters

    The uncomfortable truth: security plugins are only as good as your habits.

    If you install a plugin and never update anything again, you’ll still get hit. If you lock down logins but keep five abandoned plugins active, you’re still exposed. If your team shares one admin account, you’ve basically opted out of accountability.

    With over 11,334 new vulnerabilities disclosed in the WordPress ecosystem last year (TechTide Solutions), you don’t need to be paranoid—you need to be consistent.

    Here’s the security strategy I push because it holds up under real-world mess:

    • Pick one main security plugin (Wordfence or iThemes or All In One, etc.). Stacking overlapping tools tends to create conflicts and alert fatigue.
    • Harden logins (rate limits + 2FA for privileged roles).
    • Patch like it’s your job (weekly schedule; emergency updates when a critical bug drops).
    • Backups you’ve actually tested (a backup that can’t be restored is a feel-good file).
    • Access control that matches your org (remove users, enforce least privilege, consider SSO once your team grows).

    One more thing that doesn’t get said enough: measure the boring stuff.

    • When was the last update applied?
    • How many admin users exist right now?
    • How many plugins are inactive but installed?
    • Do you know where your backups live?

    If you can answer those without guessing, you’re in good shape.

    Next step: pick one plugin from the list, implement the “first hour” setup above, and put a recurring calendar block for updates. Security that isn’t scheduled is security that won’t happen.

    My Experience With This

    I’m Mobeen Abdullah. I run Revnix, and I’ve spent over a decade building cloud-native solutions and security strategies. I’ve also had to do the unglamorous part: cleaning up compromised sites, tracing how access was gained, and explaining to stressed-out teams why “we installed a security plugin” didn’t prevent a mess.

    One incident I still remember: a content site started throwing random redirects only on mobile. Desktop looked fine. The owner thought it was an ad network problem. It wasn’t.

    What actually happened was classic:

    • an outdated plugin provided the entry point
    • a malicious PHP file got dropped into a writable directory
    • the malware served conditional redirects (user-agent based), so the team didn’t see it during quick checks

    The fix wasn’t just “scan and delete.” We had to:

    1. Put the site in maintenance mode (stop the bleeding).
    2. Rotate passwords (WordPress admins, hosting panel, database, SFTP).
    3. Reinstall clean core files (don’t trust compromised ones).
    4. Remove the vulnerable plugin and replace it.
    5. Scan + diff key directories (wp-content/plugins, wp-content/uploads, mu-plugins).
    6. Add login controls + 2FA so the next attempt was harder.
    7. Set up a weekly update cadence—because the root cause was neglect, not lack of tools.

    That’s why I’m biased toward boring, repeatable security: fewer plugins, clear ownership, and a routine. Tools help, but habits win.

    If you want more comparisons and perspectives, here are a few decent roundups worth skimming (then make your own call):

  • Personalize Your Emails for Better Engagement in 2026

    Personalize Your Emails for Better Engagement in 2026

    Discover how to personalize your email marketing campaigns in 2026 for improved engagement and customer loyalty. Learn effective techniques and strategies.

    Featured image for How to Personalize Your Emails for Better Engagement in 2026

    How to Personalize Your Emails for Better Engagement in 2026

    Email marketing is evolving rapidly, and personalization has become a cornerstone of effective campaigns. In 2026, marketers face the challenge of making their emails stand out in crowded inboxes.

    That said, “crowded inbox” isn’t an excuse to spray-and-pray. If your emails look and sound like everyone else’s, they’ll get treated like everyone else’s—skimmed, ignored, or unsubscribed.

    Personalization is key to achieving high engagement rates, and understanding how to implement it can significantly boost your email marketing effectiveness. The trick is making it feel helpful rather than creepy, and repeatable rather than fragile.

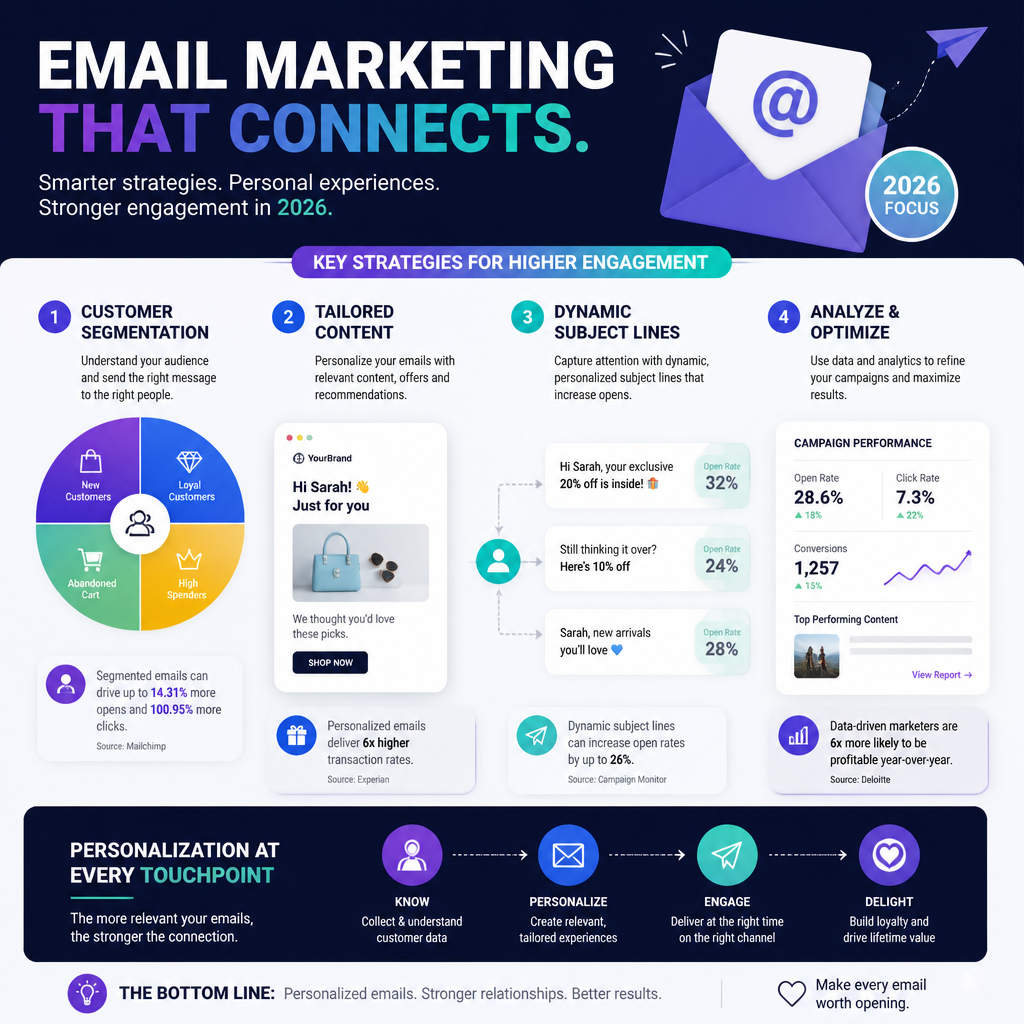
    How to personalize your emails for better engagement in 2026—segmentation and dynamic blocks example

    Why Personalization Matters

    Personalized email marketing strategies are proven to enhance engagement and drive conversions. According to a study, personalized emails have an open rate that is 26% higher than generic emails (Campaign Monitor).

    But the real reason personalization matters is simpler: it reduces “mental load.” People don’t want more content. They want the right content.

    It’s about relevance, not tricks

    If you only take one idea from this section, take this: personalization is just relevance you can scale.

    So yes, names can help. But I’ve seen the opposite too—Hey , because the first name field is blank, or Hey {FNAME} because the merge tag broke. Those are unforced errors, and they train subscribers to distrust your email.

    What actually moves the needle is matching the email to the subscriber’s intent:

    • A new lead wants clarity and proof (what is this, why should I care).
    • A first-time buyer wants guidance (how to use it, what to do next).
    • A repeat buyer wants speed (reorder, refills, upgrades).
    • A lapsed customer wants a reason to come back (newness, incentives, timing).

    Because those intents are different, the “same” newsletter sent to all four groups usually underperforms.

    A quick example I’ve watched play out

    A couple years back, I worked with a small eCommerce brand that sold two very different product categories: everyday essentials and giftable premium items. Their weekly email blasted the full catalog to everyone.

    We didn’t redesign anything at first. Instead, we split the list into three segments:

    1. Essentials-first buyers (80%+ of purchases in essentials)
    2. Gifts-first buyers
    3. Browsers (high clicks, low purchases)

    Then we changed only two things: the hero product and the opening paragraph. Essentials got “restock” language and practical bundles. Gifts got “occasion” framing and tighter curation. Browsers got bestsellers plus a simple quiz-style CTA.

    Even with the same sending schedule, engagement lifted fast because the content finally matched why people were there.

    Common mistakes that kill trust

    Personalization backfires when it’s sloppy or overly invasive.

    • Using sensitive data for “wow”: referencing exact browsing behavior in the subject line can feel gross, even if it’s technically accurate.
    • Over-segmenting too early: 18 micro-segments sounds smart until each one has 47 people and you can’t learn anything.
    • Personalizing the wrong layer: swapping product blocks while keeping generic copy often reads like a thin veneer.

    If you’re unsure, start “boring”: segment by lifecycle stage and purchase category. Those two alone can carry a lot of weight.

    How to Personalize Your Emails for Better Engagement

    This is the part where most teams jump straight to automation. I’d rather you earn it.

    Start with segmentation and messaging, then add dynamic content, then add triggers. Each layer should make the previous one easier—not more chaotic.

    Segment Your Audience Effectively

    Segmentation is about dividing your email list into smaller, more targeted groups. You can segment based on various factors such as demographics, purchase history, and engagement level.

    For instance, sending different messages to new subscribers compared to loyal customers can dramatically improve engagement rates.

    A real-world example comes from iContact, where small businesses outsmarted corporate giants by employing targeted email segments that addressed specific customer needs (iContact). They tailored their messaging, resulting in higher open rates and conversions.

    The segmentation ladder I actually use

    If you’re stuck, run this ladder from top to bottom. Stop when you’re getting clearer results.

    1. Lifecycle: subscriber → lead → first-time customer → repeat → VIP → lapsed
    2. Engagement: active (clicked recently) vs. inactive (no opens/clicks in X days)
    3. Category affinity: what they browse/buy most
    4. Price sensitivity: full-price buyers vs. discount-driven
    5. Channel source: paid social vs. organic vs. referral (messaging differs)

    Lifecycle segmentation is the cheapest win because your data is usually reliable (signup date, purchase count). Meanwhile, “interests” can be messier unless you track it well.

    Common segmentation mistakes

    • No backstop for tiny segments: always have a fallback group (e.g., “General: Active”) so you don’t strand people.
    • Ignoring deliverability: if you keep mailing inactive subscribers forever, inbox placement can slide. Segmenting engagement helps you throttle.
    • Not documenting rules: if the team can’t explain who’s in a segment, you’ll break it later.

    Use Dynamic Content

    Dynamic content enables you to customize the content of your emails based on the recipient’s data. This can include product recommendations, tailored offers, or relevant blog posts that match their interests.

    For example, if a customer frequently buys poetry books, you can highlight new arrivals in that genre in your emails. Implementing dynamic content can lead to significant increases in engagement as it makes the email feel personally crafted for the recipient.

    A practical dynamic content setup

    When I implement dynamic blocks, I keep it tight:

    • One “smart” block per email at first (hero OR product grid OR CTA)
    • Two variants max to start (Variant A / Variant B)
    • A default version that’s safe for everyone

    Why? Because dynamic content can quietly break. If you launch five conditional blocks at once, you won’t know which one caused the weird dip in clicks.

    Also, preview it like you mean it. I’ll usually create 6–10 test contacts that represent real states (VIP, lapsed, no-first-name, no-purchase) and run inbox previews before I trust the send.

    Tailor Subject Lines and Preheaders

    The subject line is the first thing your subscribers see, and a personalized subject line can significantly improve your open rates. Using data such as previous interactions or preferences can help you craft these.

    For instance, instead of a generic subject like “New Arrivals,” you could say, “[Name], Your Favorite Authors Have New Books Out!” This kind of attention can drastically change how your emails perform.

    My subject line rules (learned the hard way)

    • Personalize with context, not flattery: “Back in stock: the size you wanted” beats “Hey Sarah!” most days.
    • Write the preheader as sentence #2: don’t waste it on “View in browser.”
    • Avoid brittle merge tags unless you’ve validated the data (and you have a default).

    A small trick that helps: write 10 subject lines, then delete the five that sound like marketing. What’s left is usually closer to human.

    Optimize Send Frequency

    Finding the right time and frequency to send your emails is critical. Over-saturating your audience with emails can lead to unsubscribes, while too few can make your audience forget you.

    Use analytics to find the sweet spot. You might discover that your audience responds better to weekend emails rather than weekdays or that certain times yield higher open rates.

    Frequency isn’t one-size-fits-all

    Here’s what I do instead of guessing:

    1. Pick a baseline (say, 1–2 sends/week).
    2. Split by engagement: active subscribers can handle more; inactive should get less.
    3. Watch complaints and unsubscribes alongside opens/clicks.
    4. Throttle promotions: if you run heavy discounts, build “quiet weeks” on purpose.

    One thing people miss: frequency problems often come from content sameness, not volume. If every email is “20% off,” even one per week can feel like spam.

    Implement Behavioral Triggered Emails

    Behavioral triggers allow you to send emails based on specific actions a user takes, such as abandoning a cart or signing up for a newsletter.

    For example, if a customer adds items to their cart but doesn’t complete the purchase, sending a reminder email can prompt them back to your site. This technique can boost email ROI and is particularly effective for eCommerce businesses.

    A step-by-step trigger plan you can ship this month

    If you’re starting from scratch, ship these in this order:

    1. Welcome series (2–4 emails)
    2. Email 1: set expectations + best content/product
    3. Email 2: social proof + FAQs
    4. Email 3: personalization ask (preferences) or starter guide
    5. Browse abandon (1–2 emails)
    6. “Still looking?” with category-based recommendations
    7. Cart abandon (2–3 emails)
    8. Reminder → objections (shipping/returns) → urgency (light)
    9. Post-purchase (2–5 emails)
    10. How to use → care tips → cross-sell that makes sense
    11. Winback (2–3 emails)
    12. New arrivals → incentive (optional) → last call

    Keep the copy specific. “Complete your purchase” is generic; “Your cart’s ready—shipping is free over $50” is useful.

    Mistakes I see constantly in triggers

    • Sending a cart email to someone who already bought (bad event timing, slow sync)
    • Discounting too fast so people learn to abandon carts on purpose
    • Stacking triggers so a subscriber gets welcome + browse + promo on the same day

    If your tool allows it, add a simple rule: “max 1 automated email per 24 hours” unless it’s transactional.

    Analyze and Improve

    The beauty of email marketing lies in the metrics. Make it a habit to analyze your email performance regularly.

    Track metrics such as open rates, click-through rates, and conversions to understand what’s working and what’s not. Utilize this data to refine your strategies continually.

    For instance, if you notice a drop in engagement after a specific change, be prepared to adjust your tactics accordingly.

    What I measure (and what I ignore)

    I care about:

    • Clicks per delivered (not just CTR on opens)
    • Revenue per recipient for promos
    • Conversion rate from click (landing pages matter)
    • Unsubscribes + spam complaints by segment

    I’m careful with:

    • Open rate as a “win” metric. It’s still directional, but it’s not the whole story.

    And I always annotate the timeline. When results change, you want to know whether it was a subject line test, a list growth spike, a deliverability issue, or a new offer.

    Starting with Email Marketing

    For those new to email marketing, starting with a solid foundation is critical. Consider enrolling in an email marketing course that covers the basics of email marketing, including list building, content creation, and analytics.

    But before you buy anything, build one working loop: collect emails → send something valuable → learn from the data → repeat. Tools and templates don’t rescue a shaky loop.

    Your first 30 days (a real starter plan)

    If I were mentoring a beginner, here’s the month plan I’d hand them:

    Week 1: Get the boring stuff right
    – Set up a sending domain (or at least authenticate properly in your platform).
    – Create one clean list and one suppression list.
    – Write down your “from name” and stick with it.

    Week 2: Build your core emails
    – One newsletter template (simple, scannable).
    – A 2-email welcome series.
    – One promo email layout you can reuse.

    Week 3: Add one personalization lever
    – Collect a preference (category, use case, or role).
    – Segment based on that single preference.

    Week 4: Run one test
    – A/B test a subject line OR CTA.
    – Pick a winner, then document it.

    That’s enough to start compounding.

    Utilizing Email Marketing Tools

    With so many tools available, selecting the right one can enhance your email marketing efforts significantly.

    If you’re shopping around, I’d start by scanning the best email marketing tools of 2026 and then narrowing based on what you actually need: segmentation depth, automation builder, reporting, and how painful (or painless) integrations are.

    What I look for in a tool (so I don’t regret it later)

    • Event tracking that’s trustworthy (purchase, browse, cart, form submit)
    • Automation with guardrails (frequency caps, exclusions)
    • Decent QA (previews by segment/state)
    • Migration support if you’re moving from another platform

    Common mistake: teams buy the tool with the fanciest automation builder, then never fix the data feeding it. Personalization doesn’t work if “product viewed” fires randomly.

    Emphasizing Compliance and Best Practices

    As you delve into email marketing, maintaining compliance with regulations like GDPR and CAN-SPAM is crucial.

    Ensure that you’re obtaining consent from users before sending them emails and that you provide them with a clear option to unsubscribe.

    Respecting your subscribers’ choices fosters trust and long-term relationships.

    A practical compliance habit

    I’m not a lawyer, so I won’t pretend to give legal advice. Still, operationally, here’s what keeps you out of trouble most of the time:

    • Use double opt-in when list quality matters more than raw growth.
    • Store signup source + timestamp.
    • Keep your unsubscribe link visible, and process it fast.

    If you ever get hit with a deliverability problem, having clean consent records makes the support conversation a lot less painful.

    Career Insights in Email Marketing

    With the rise of personalized marketing strategies, email marketing jobs are becoming increasingly relevant.

    The demand is real, but the bar has changed. Companies don’t just want “someone who can send newsletters.” They want someone who can run lifecycle programs, debug tracking, and explain performance without hand-waving.

    Email Marketing Salary Trends

    Salaries in the email marketing field vary based on experience and location but are generally competitive. According to recent data, the average email marketing manager earns between $60,000 to $85,000 annually, with experienced professionals commanding higher rates.

    For those considering a career in this field, developing skills in analytics, automation, and personalization can set you apart.

    What tends to push you toward the top of that range

    In my experience hiring and working alongside email folks, the people who get paid more usually do at least two of these well:

    • Own revenue numbers (not just “engagement”)
    • Build automations that don’t spam customers
    • Work with data (events, UTM discipline, basic SQL or at least strong reporting)
    • Understand deliverability enough to prevent fires

    If you can walk into an interview and calmly explain why clicks fell—“we changed segmentation, deliverability dipped in Gmail, and the landing page slowed down”—you’re already ahead.

    Preparing for Email Marketing Jobs

    If you’re aiming for a role in email marketing, consider undertaking specific training or certifications.

    There are numerous online courses available that focus on the nuances of email marketing, providing valuable insights that potential employers look for.

    Additionally, hands-on experience through internships or freelance projects can enhance your employability.

    A portfolio project that actually impresses

    If you don’t have professional experience yet, build a small “fake brand” lifecycle program and document it:

    1. Define two customer personas.
    2. Write a 3-email welcome series for each.
    3. Mock up segmentation rules.
    4. Create one triggered flow (cart abandon or winback).
    5. Add a measurement plan (what you’d track and why).

    Don’t just show pretty designs. Show decisions.

    A quick anecdote (the kind that happens on real teams)

    I once watched a junior marketer lose confidence because a manager kept saying, “Just personalize more.” No specifics.

    We sat down, pulled up the account, and realized the “personalization” problem was basic: half the list had no purchase data because the checkout integration was failing. The fix wasn’t copywriting—it was debugging.

    That’s the job now. You’ll write emails, sure, but you’ll also spend time making sure the inputs are real.

    Conclusion

    Personalization in email marketing is no longer optional; it’s a necessity.

    But you don’t need to boil the ocean. If you only improve three things this quarter—segmentation by lifecycle, one dynamic block, and one trigger flow—you’ll usually feel it in engagement and revenue.

    A simple next-step checklist

    If you want a clean plan for the next 2–3 weeks, do this:

    1. Audit your data fields (first name, last purchase date, category, engagement).
    2. Create 3 core segments: new subscribers, active customers, lapsed.
    3. Write one email for each that answers a different “job to be done.”
    4. Add one automation (welcome series is the safest start).
    5. Measure clicks per delivered and unsubscribes by segment.

    Then iterate. Don’t keep changing everything at once, because you won’t learn what caused what.

    Common mistakes to avoid in 2026

    • Chasing personalization gimmicks while ignoring list hygiene
    • Letting promos dominate until every email feels transactional
    • Forgetting the landing page (personalized email + generic landing page is a leaky bucket)
    • Buying a new platform before you’ve fixed your strategy

    If you’re evaluating tooling, check out Email Marketing Platforms Comparison 2026 and cross-reference it with what you actually plan to build.

    Also, if you just want a shortlist to start from, browse Top Email Marketing Platforms 2026 and Top Email Marketing Platforms for 2026—then pick the one you’ll realistically use every week.

    Personalization pays off when it’s consistent. Ship something small, make it work, and keep tightening the loop.

  • Headless CMS and Next.js: Your 2026 Guide

    Headless CMS and Next.js: Your 2026 Guide

    Discover how to effectively integrate Headless CMS with Next.js in 2026, enhancing your web development projects.

    Featured image for Getting Started with Headless CMS and Next.js in 2026

    Getting Started with Headless CMS for Next.js

    A Headless CMS gives you an admin UI for editors and an API for developers—without forcing you into a specific front end. Next.js is a great match because it can render content a bunch of different ways depending on the page and traffic.

    Understanding Headless CMS

    A Headless CMS stores content and exposes it over an API (REST and/or GraphQL), while your Next.js app handles routing, layouts, and rendering.

    Here’s what actually matters in the 2026 day-to-day:

    • Flexibility: you can redesign the front end without rewriting content models. That’s not theoretical; it’s the difference between a 2-week refresh and a 2-month “replatform.”
    • Omnichannel delivery: the same “Article” can power the website, an in-app help center, and even an internal dashboard. You’re not duplicating copy across systems.
    • Separation of concerns: editors work in the CMS, devs work in Next.js. That separation reduces merge conflicts, but it also forces you to define content types clearly (which is a good pain).

    One important nuance: “headless” doesn’t automatically mean “faster.” You still have to choose SSR vs SSG vs ISR wisely, and you still need caching. Otherwise you just moved the bottleneck.

    Benefits of Using Headless CMS with Next.js

    1. Enhanced Performance: Next.js gives you SSR and SSG, so you can ship fast pages and keep SEO-friendly HTML. But you only win if you avoid doing live CMS fetches on every request for pages that don’t change hourly.
    2. Developer Experience: file-based routing, server components (where it fits), and a big ecosystem make integration pretty straightforward. That said, a sloppy content model will still make your front end miserable.
    3. Scalability: scaling in a headless world usually means (a) scaling API reads, (b) controlling cache invalidation, and (c) keeping editorial workflows sane. Next.js helps, but it won’t magically fix content chaos.

    Tradeoff I’ll call out: headless setups can become “distributed systems” surprisingly fast—CMS, web app, image CDN, search, preview environment, webhook handlers. You get power, but you also get more moving parts to monitor.

    Popular Headless CMS Options for Next.js

    Several CMS options are compatible with Next.js. These three come up constantly for good reasons:

    • Payload: open-source, TypeScript-native, and developer-first. It’s a strong choice when you want to own your data model and keep types tight.
    • Sanity: great real-time editing and collaboration, plus a flexible schema. Teams with lots of editorial iteration tend to like it.
    • Strapi: open-source with a plugin ecosystem and lots of community knowledge. It’s often the “default” pick for teams that want something familiar.

    My opinionated filter when choosing:

    • If your team cares about TypeScript end-to-end and you want to keep CMS logic close to your app, Payload is hard to beat.
    • If editors need live collaboration and structured content will evolve weekly, Sanity shines.
    • If you need something straightforward and you’re okay spending time on config and plugins, Strapi can work.

    Resources for Next.js Headless CMS Templates

    Templates can save you time, but they can also bake in odd decisions (auth assumptions, caching patterns, folder structure). So I treat them like scaffolding, not architecture.

    When you evaluate a template, look for:

    • Customization: can you change the content model without fighting the starter? If every field is hardcoded into a UI component, that starter will age badly.
    • Community and Support: active issues, recent commits, and real examples. A dead starter is technical debt with a README.
    • Documentation: not just “run npm install,” but details on preview, webhooks, and deployment.

    Recommended Templates:
    – Starter templates for Payload CMS can often be found on their official GitHub repository.
    – Next.js templates on platforms like Vercel or Template resources to quickly deploy your applications.

    One more practical tip: before you commit, run a “content change drill.” Add a field to the content type and see how many places in the front end you have to touch. If it’s more than you expected, your model or rendering strategy needs work.

    Using Payload CMS with Next.js

    Payload CMS is a solid choice with Next.js in 2026 because it doesn’t fight the way modern Next apps are built. If you like TypeScript, predictable local dev, and owning your schema, it’s a comfortable setup.

    Why Choose Payload?

    Payload is designed to integrate cleanly with Next.js, and a few details make it genuinely pleasant:

    • Comprehensive API: you can query content without inventing a custom backend layer. That’s fewer servers and fewer “why is this endpoint different?” conversations.
    • Typescript Support: typed collections reduce dumb mistakes—like shipping a component that assumes author.name exists when your model uses displayName.
    • Document-based Structure: it maps nicely to things like pages, posts, case studies, docs, and products.

    Where Payload can bite you: permissions and drafts. It’s powerful, but it means you have to be explicit about read access, preview behavior, and what “published” really means.

    Here’s the real-world pattern I’ve seen work: treat the CMS like a product. Version your schema changes, review access rules like you review code, and don’t let “just add a field” happen directly in production.

    Setting Up Payload CMS

    I’ll lay this out as a practical build checklist—the order matters because it prevents you from painting yourself into a corner.

    1. Install Payload:
      Run the command to set up a new Payload project directly in your Next.js app:
      bash
      npx create-payload-app

    2. Configuration:
      Configure your Payload CMS settings in the payload.config.ts file. This includes defining your collections, fields, and permissions.

    Start small. One collection. A couple fields. Get the full loop working (create → preview → publish → render) before you model your entire company.

    A sane first collection:
    pages: title (text), slug (text), layout (blocks), publishedAt (date), status (draft/published)

    Then lock down access rules:
    – Public users: can read only published pages
    – Editors: can read/write drafts
    – Admins: can manage users and globals

    1. Fetch Data:
      Use Payload’s API to fetch content. For instance:
      javascript
      import { usePayload } from 'payload-hooks';
      const { docs } = usePayload('my-collection');

    Practical note: be careful with where you fetch.

    • For mostly-static marketing pages, prefer build-time/ISR fetches and cache aggressively.
    • For authenticated dashboards or frequently changing data, SSR (or server actions) can make sense.

    Don’t default to “fetch on every request” because it’s easy. Your CMS will become your bottleneck the first time a campaign spikes traffic.

    1. Deploy:
      Finally, deploy your application to a platform like Vercel, which provides an ideal environment for Next.js applications.

    Before you hit deploy, wire up:
    – environment variables for database + secrets
    – a preview environment (or branch deployments)
    – a webhook strategy for revalidation (so content updates actually show up)

    This is the part people skip, and then they wonder why editors are doing hard refreshes and Slack’ing screenshots.

    Payload CMS in Action

    I’ll give you two examples: one from the wild (linked), and one I’ve personally seen play out on teams.

    First, there’s a public case study: Michigan Business adopted Payload CMS for their content needs. The thing to notice in setups like that isn’t “they used Payload,” it’s why: faster iteration, clearer separation between content updates and code deploys, and less friction for the people who actually maintain the site day to day.

    For more in-depth information, refer to the source of the payload integration’s success story in Michigan here.

    Now the gritty example I see a lot: a team starts with a simple marketing site, then adds a resources hub, then adds gated PDFs, then adds a partner directory. At first, they hardcode a bunch of stuff because “it’s just a few pages.” Six months later, every change requires a developer, and the CMS is basically a blog no one trusts.

    Here’s how I’d run that migration to Payload + Next.js without breaking everything:

    1. Inventory content: list every page type (landing page, case study, blog post, docs page). Count them. Identify what actually changes weekly.
    2. Define a minimal content model: don’t model the universe. Model what you ship. If you need flexible layouts, use blocks—but keep the block set small.
    3. Build one vertical slice: create one page type end-to-end: CMS entry → API fetch → Next.js route → SEO tags → preview.
    4. Add preview early: if editors can’t preview drafts, they’ll either publish risky changes or stop using the CMS.
    5. Set up revalidation: publish should trigger an update. If you rely on “wait for the cache,” people will lose confidence.
    6. Backfill content: migrate content in batches, not a giant weekend cutover. You’ll catch model gaps faster.

    Common mistakes (I’ve made a couple of these myself):

    • Overusing “blocks”: blocks are great, but unlimited freedom turns into inconsistent pages and a messy front end. I cap block types and I document when to use each.
    • Forgetting access rules: someone will accidentally expose drafts if you don’t explicitly protect them.
    • Not planning images: if your media pipeline is an afterthought, you’ll end up serving huge images and tanking performance.
    • No rollback plan: content changes can break layout. Keep a way to revert quickly—versioning, backups, or at least a “duplicate page” workflow.

    If you want more reading around architecture decisions, I’ve seen good overviews like Why Payload CMS is the Best CMS for NextJS and broader comparisons such as Next.js CMS: Best Headless CMS Choices for 2026. I don’t treat any single post as gospel, but they’re useful for framing tradeoffs.

    Headless CMS with Next.js content flow diagram

    Conclusion

    Headless CMS + Next.js isn’t a trend in 2026—it’s the default shape for teams that want speed without handing the keys to a fragile theme layer.

    But here’s the honest part: you only get the payoff if you run it like a system, not a pile of tools. Your content model needs boundaries, your rendering strategy needs intent, and your editor workflow needs to match how your team actually works.

    A quick persona story I’ve watched play out: a product marketer wants to launch 12 new pages for a campaign next Tuesday. The dev team is already booked. In a coupled CMS, that request turns into “pick a template and pray.” In a good headless setup, the marketer duplicates a page, swaps blocks, updates copy, previews it, and hits publish—while the dev team stays focused on the product.

    That’s the win. Not “API-first,” not buzzwords. Just fewer bottlenecks.

    If you’re about to implement this, my recommended next step is boring on purpose:

    1. Pick one content type (like pages or posts).
    2. Ship it end-to-end with Payload + Next.js including preview and revalidation.
    3. Only then expand the schema.

    And if you’re still deciding on the front end side of headless, this perspective on the Best frontend for headless CMS is a decent jumping-off point.

    Build the smallest thing that proves the workflow—then scale it. That’s how you avoid rebuilding it again next year.

  • Headless CMS and Next.js: Your 2026 Guide

    Discover how to effectively integrate Headless CMS with Next.js in 2026, enhancing your web development projects.

    Featured image for Getting Started with Headless CMS and Next.js in 2026

    Getting Started with Headless CMS for Next.js

    A Headless CMS gives you an admin UI for editors and an API for developers—without forcing you into a specific front end. Next.js is a great match because it can render content a bunch of different ways depending on the page and traffic.

    Understanding Headless CMS

    A Headless CMS stores content and exposes it over an API (REST and/or GraphQL), while your Next.js app handles routing, layouts, and rendering.

    Here’s what actually matters in the 2026 day-to-day:

    • Flexibility: you can redesign the front end without rewriting content models. That’s not theoretical; it’s the difference between a 2-week refresh and a 2-month “replatform.”
    • Omnichannel delivery: the same “Article” can power the website, an in-app help center, and even an internal dashboard. You’re not duplicating copy across systems.
    • Separation of concerns: editors work in the CMS, devs work in Next.js. That separation reduces merge conflicts, but it also forces you to define content types clearly (which is a good pain).

    One important nuance: “headless” doesn’t automatically mean “faster.” You still have to choose SSR vs SSG vs ISR wisely, and you still need caching. Otherwise you just moved the bottleneck.

    Benefits of Using Headless CMS with Next.js

    1. Enhanced Performance: Next.js gives you SSR and SSG, so you can ship fast pages and keep SEO-friendly HTML. But you only win if you avoid doing live CMS fetches on every request for pages that don’t change hourly.
    2. Developer Experience: file-based routing, server components (where it fits), and a big ecosystem make integration pretty straightforward. That said, a sloppy content model will still make your front end miserable.
    3. Scalability: scaling in a headless world usually means (a) scaling API reads, (b) controlling cache invalidation, and (c) keeping editorial workflows sane. Next.js helps, but it won’t magically fix content chaos.

    Tradeoff I’ll call out: headless setups can become “distributed systems” surprisingly fast—CMS, web app, image CDN, search, preview environment, webhook handlers. You get power, but you also get more moving parts to monitor.

    Popular Headless CMS Options for Next.js

    Several CMS options are compatible with Next.js. These three come up constantly for good reasons:

    • Payload: open-source, TypeScript-native, and developer-first. It’s a strong choice when you want to own your data model and keep types tight.
    • Sanity: great real-time editing and collaboration, plus a flexible schema. Teams with lots of editorial iteration tend to like it.
    • Strapi: open-source with a plugin ecosystem and lots of community knowledge. It’s often the “default” pick for teams that want something familiar.

    My opinionated filter when choosing:

    • If your team cares about TypeScript end-to-end and you want to keep CMS logic close to your app, Payload is hard to beat.
    • If editors need live collaboration and structured content will evolve weekly, Sanity shines.
    • If you need something straightforward and you’re okay spending time on config and plugins, Strapi can work.

    Resources for Next.js Headless CMS Templates

    Templates can save you time, but they can also bake in odd decisions (auth assumptions, caching patterns, folder structure). So I treat them like scaffolding, not architecture.

    When you evaluate a template, look for:

    • Customization: can you change the content model without fighting the starter? If every field is hardcoded into a UI component, that starter will age badly.
    • Community and Support: active issues, recent commits, and real examples. A dead starter is technical debt with a README.
    • Documentation: not just “run npm install,” but details on preview, webhooks, and deployment.

    Recommended Templates:
    – Starter templates for Payload CMS can often be found on their official GitHub repository.
    – Next.js templates on platforms like Vercel or Template resources to quickly deploy your applications.

    One more practical tip: before you commit, run a “content change drill.” Add a field to the content type and see how many places in the front end you have to touch. If it’s more than you expected, your model or rendering strategy needs work.

    Using Payload CMS with Next.js

    Payload CMS is a solid choice with Next.js in 2026 because it doesn’t fight the way modern Next apps are built. If you like TypeScript, predictable local dev, and owning your schema, it’s a comfortable setup.

    Why Choose Payload?

    Payload is designed to integrate cleanly with Next.js, and a few details make it genuinely pleasant:

    • Comprehensive API: you can query content without inventing a custom backend layer. That’s fewer servers and fewer “why is this endpoint different?” conversations.
    • Typescript Support: typed collections reduce dumb mistakes—like shipping a component that assumes author.name exists when your model uses displayName.
    • Document-based Structure: it maps nicely to things like pages, posts, case studies, docs, and products.

    Where Payload can bite you: permissions and drafts. It’s powerful, but it means you have to be explicit about read access, preview behavior, and what “published” really means.

    Here’s the real-world pattern I’ve seen work: treat the CMS like a product. Version your schema changes, review access rules like you review code, and don’t let “just add a field” happen directly in production.

    Setting Up Payload CMS

    I’ll lay this out as a practical build checklist—the order matters because it prevents you from painting yourself into a corner.

    1. Install Payload:
      Run the command to set up a new Payload project directly in your Next.js app:
      bash
      npx create-payload-app

    2. Configuration:
      Configure your Payload CMS settings in the payload.config.ts file. This includes defining your collections, fields, and permissions.

    Start small. One collection. A couple fields. Get the full loop working (create → preview → publish → render) before you model your entire company.

    A sane first collection:
    pages: title (text), slug (text), layout (blocks), publishedAt (date), status (draft/published)

    Then lock down access rules:
    – Public users: can read only published pages
    – Editors: can read/write drafts
    – Admins: can manage users and globals

    1. Fetch Data:
      Use Payload’s API to fetch content. For instance:
      javascript
      import { usePayload } from 'payload-hooks';
      const { docs } = usePayload('my-collection');

    Practical note: be careful with where you fetch.

    • For mostly-static marketing pages, prefer build-time/ISR fetches and cache aggressively.
    • For authenticated dashboards or frequently changing data, SSR (or server actions) can make sense.

    Don’t default to “fetch on every request” because it’s easy. Your CMS will become your bottleneck the first time a campaign spikes traffic.

    1. Deploy:
      Finally, deploy your application to a platform like Vercel, which provides an ideal environment for Next.js applications.

    Before you hit deploy, wire up:
    – environment variables for database + secrets
    – a preview environment (or branch deployments)
    – a webhook strategy for revalidation (so content updates actually show up)

    This is the part people skip, and then they wonder why editors are doing hard refreshes and Slack’ing screenshots.

    Payload CMS in Action

    I’ll give you two examples: one from the wild (linked), and one I’ve personally seen play out on teams.

    First, there’s a public case study: Michigan Business adopted Payload CMS for their content needs. The thing to notice in setups like that isn’t “they used Payload,” it’s why: faster iteration, clearer separation between content updates and code deploys, and less friction for the people who actually maintain the site day to day.

    For more in-depth information, refer to the source of the payload integration’s success story in Michigan here.

    Now the gritty example I see a lot: a team starts with a simple marketing site, then adds a resources hub, then adds gated PDFs, then adds a partner directory. At first, they hardcode a bunch of stuff because “it’s just a few pages.” Six months later, every change requires a developer, and the CMS is basically a blog no one trusts.

    Here’s how I’d run that migration to Payload + Next.js without breaking everything:

    1. Inventory content: list every page type (landing page, case study, blog post, docs page). Count them. Identify what actually changes weekly.
    2. Define a minimal content model: don’t model the universe. Model what you ship. If you need flexible layouts, use blocks—but keep the block set small.
    3. Build one vertical slice: create one page type end-to-end: CMS entry → API fetch → Next.js route → SEO tags → preview.
    4. Add preview early: if editors can’t preview drafts, they’ll either publish risky changes or stop using the CMS.
    5. Set up revalidation: publish should trigger an update. If you rely on “wait for the cache,” people will lose confidence.
    6. Backfill content: migrate content in batches, not a giant weekend cutover. You’ll catch model gaps faster.

    Common mistakes (I’ve made a couple of these myself):

    • Overusing “blocks”: blocks are great, but unlimited freedom turns into inconsistent pages and a messy front end. I cap block types and I document when to use each.
    • Forgetting access rules: someone will accidentally expose drafts if you don’t explicitly protect them.
    • Not planning images: if your media pipeline is an afterthought, you’ll end up serving huge images and tanking performance.
    • No rollback plan: content changes can break layout. Keep a way to revert quickly—versioning, backups, or at least a “duplicate page” workflow.

    If you want more reading around architecture decisions, I’ve seen good overviews like Why Payload CMS is the Best CMS for NextJS and broader comparisons such as Next.js CMS: Best Headless CMS Choices for 2026. I don’t treat any single post as gospel, but they’re useful for framing tradeoffs.

    Headless CMS with Next.js content flow diagram

    Conclusion

    Headless CMS + Next.js isn’t a trend in 2026—it’s the default shape for teams that want speed without handing the keys to a fragile theme layer.

    But here’s the honest part: you only get the payoff if you run it like a system, not a pile of tools. Your content model needs boundaries, your rendering strategy needs intent, and your editor workflow needs to match how your team actually works.

    A quick persona story I’ve watched play out: a product marketer wants to launch 12 new pages for a campaign next Tuesday. The dev team is already booked. In a coupled CMS, that request turns into “pick a template and pray.” In a good headless setup, the marketer duplicates a page, swaps blocks, updates copy, previews it, and hits publish—while the dev team stays focused on the product.

    That’s the win. Not “API-first,” not buzzwords. Just fewer bottlenecks.

    If you’re about to implement this, my recommended next step is boring on purpose:

    1. Pick one content type (like pages or posts).
    2. Ship it end-to-end with Payload + Next.js including preview and revalidation.
    3. Only then expand the schema.

    And if you’re still deciding on the front end side of headless, this perspective on the Best frontend for headless CMS is a decent jumping-off point.

    Build the smallest thing that proves the workflow—then scale it. That’s how you avoid rebuilding it again next year.

  • Benefits of Using WordPress as Your Main CMS

    Explore the advantages of using WordPress as your main CMS solution. Learn about its integration features, user management capabilities, and plugin functionalities. Discover why it’s a top choice for marketers, web developers, and business owners.

    Featured image for Benefits of Using WordPress as Your Main CMS Solution

    Benefits of Using WordPress as a CMS

    WordPress has established itself not just as a blogging platform but as a full-fledged CMS that supports various website types. Its flexibility, user-friendliness, and extensive ecosystem make it a top choice.

    I’m biased toward “boring and reliable” CMS setups: clean publishing flows, predictable permissions, and integrations that don’t require a custom app for every little thing. WordPress does that well—if you set it up with a little discipline.

    Versatile CMS capabilities

    WordPress is incredibly versatile. Organizations use it for everything from simple blogs to complex eCommerce sites. That range is largely due to themes and plugins that cover most common needs.

    A practical example: I’ve helped a small services business start with a five-page marketing site, then add lead magnets, a knowledge base, and eventually paid training. We didn’t swap platforms. We just added pieces in stages (forms + CRM sync first, then membership, then payments) and kept the editorial workflow stable the whole time.

    WooCommerce is the obvious eCommerce path, and it’s solid when you keep the stack lean. Membership plugins can enable subscription models without heavy coding. The tradeoff: you have to think like a site owner, not a plugin collector. Every added feature is also something you’ll maintain.

    User-friendly interface

    One of WordPress’s strongest advantages is its user-friendly interface. Marketers and business owners can create and manage content without extensive technical knowledge, and the dashboard is familiar enough that new hires don’t need a week of training.

    The real win I see in practice is speed. When the editor experience is straightforward, teams publish more consistently. Campaign landing pages don’t get stuck in “dev queue” for two weeks. That agility matters more than people admit—especially when you’re reacting to product updates, seasonal promos, or PR.

    Strong community support

    With millions of users worldwide, WordPress has deep community support. That turns into real-world benefits: troubleshooting forums, tutorials, meetups, documentation, and a huge talent pool.

    It also means there are established “known good” ways to do common tasks (caching, backups, migrations, security hardening). When something breaks at 4:45pm on a Friday, it’s nice not to be the first person on earth to hit that problem.

    Integration with other platforms

    WordPress excels at integrating with other platforms and tools—analytics, marketing automation, CRMs, payment gateways, and email providers.

    A solid starting point is mapping what data has to move where (forms → CRM, orders → accounting, events → email list) and then choosing integrations that are well-supported. If you want a scan of common directions teams are going, Top WordPress CMS Integrations for 2026 is a useful reference.

    One caution from experience: integrations are where “quick wins” become long-term liabilities. If you duct-tape five SaaS tools together with low-quality connectors, you’ll eventually have silent failures—missing leads, duplicate contacts, broken UTM attribution. I’ve seen it. The fix is boring: fewer moving parts, better logging, and a monthly check that key flows still work.

    WordPress User Management and Customization

    The flexibility of WordPress isn’t limited to content types and layouts. User management and admin customization are where WordPress can feel either wonderfully controlled… or like a shared password free-for-all. The difference is how intentional you are.

    Comprehensive user roles and permissions

    With WordPress, you can assign roles to users—administrator, editor, author, contributor, subscriber—so you’re not giving everyone the keys to the kingdom.

    Here’s the setup I use on most marketing teams (and it’s saved me pain more than once):

    1. Give marketing “Editor,” not “Admin.” Editors can publish and manage content without being able to install random plugins.
    2. Keep Admin accounts limited to the people who actually maintain the site (dev, ops, or a trusted agency).
    3. Use “Author” for specialists (SEO writers, contractors) who should publish their own posts but not touch site-wide settings.
    4. Create a process for access requests. A simple ticket or Slack message with “why + when it’s needed” prevents privilege creep.

    Common mistake I still see: a company hires an intern, gives them Admin “just for today,” and forgets. Months later, a theme gets edited directly in production, or a plugin is installed that breaks checkout. Not malicious—just preventable.

    Customizable admin panel

    The admin panel can be customized to match how your team works. Using plugins like the WordPress Admin Panel Customization Plugin, you can clean up menus, hide irrelevant settings, and reduce “where do I click?” confusion.

    A real example: I worked with a nonprofit where volunteers published weekly updates. We removed anything not related to posts, media, and a single custom “Events” section. Support requests dropped fast because the interface stopped feeling like a cockpit.

    My rule: customize for clarity, not for aesthetics. If you hide too much without documenting it, people get stuck and start making workarounds.

    White label solutions

    If you manage multiple client sites, a white-label WordPress plugin can rebrand the backend so it matches the client’s branding. Agencies love this.

    Tradeoff (and I’m opinionated here): white labeling shouldn’t be used to obscure what the client is actually running. I’ve inherited “white-labeled mystery sites” where basic maintenance was impossible because everything was renamed. Branding is fine. Hiding the plumbing isn’t.

    Understanding WordPress Plugins

    Plugins are the superpower and the trap. They expand WordPress functionality so you don’t have to build everything from scratch—but too many plugins (or the wrong ones) will slow the site, complicate updates, and increase the chance of conflicts.

    Essential plugins for functionality

    There are over 65,000 plugins available in the WordPress repository, covering everything from SEO to security to performance.

    When I’m choosing plugins, I follow a simple checklist:

    1. Define the outcome first. “We need better SEO” is vague; “we need editable titles/meta and XML sitemaps” is actionable.
    2. Pick plugins that do one job well. All-in-one bundles sound convenient until you need to swap one feature.
    3. Check maintenance signals. Recent updates, active installs, and support responsiveness matter.
    4. Test in staging. Always. Especially on WooCommerce sites.

    Security plugins can help mitigate common threats by adding layers like login throttling, file change detection, and basic hardening. E-commerce plugins enable payment systems while keeping data handling consistent.

    A mistake I’ve seen repeatedly: installing three plugins that all try to do caching, optimization, and minification. The site gets slower, not faster, because they fight each other. Start with one performance tool, measure, then adjust.

    Keeping up with market trends

    According to recent WordPress statistics, WordPress controls 62.8% of the CMS market. That scale is a big deal because it drives plugin innovation and long-term ecosystem support.

    But “new” isn’t automatically “better.” My approach is to schedule plugin review like routine maintenance:

    • Monthly: update plugins/themes, check critical flows (forms, checkout, search), scan error logs.
    • Quarterly: remove unused plugins, replace overlapping tools, confirm backups restore cleanly.
    • Before big campaigns: freeze major changes and only ship what you can roll back quickly.

    That cadence is how you keep the flexibility without waking up to a broken site the morning of a launch.

    Conclusion

    WordPress is a strong choice for businesses that want a CMS they can actually live in—publish fast, collaborate safely, and extend features as the business grows. The upside is real: integrations, roles/permissions, and a plugin ecosystem that can take you from “basic site” to “serious platform.”

    If you’re considering WordPress, your next step is simple: list the workflows you can’t afford to break (publishing approvals, lead capture, checkout, CRM sync), then evaluate WordPress themes/plugins based on those workflows—not on how pretty the demo looks.

  • Top Free WordPress Security Plugins in 2026

    Discover the best free WordPress security plugins in 2026 that protect your site from attacks and vulnerabilities.

    Featured image for The Best Free WordPress Security Plugins for 2026

    The Best Free WordPress Security Plugins for 2026

    Most WordPress security problems aren’t Hollywood hacking scenes. They’re boring:

    • A plugin update gets delayed “until after the campaign.”
    • Someone reuses a password from an old breach.
    • The login page gets brute-forced all night.
    • A compromised admin account installs a sketchy plugin, and now you’re hosting a spam farm.

    A good free security plugin won’t make you invincible, but it will reduce your attack surface, catch obvious issues early, and give you a fighting chance when something goes sideways.

    Here are the free tools I actually see used in the wild, plus what I’d watch out for.

    1. Wordfence Security

    Wordfence is the “default pick” for a lot of site owners for a reason. The free version gives you a web application firewall (WAF), a malware scanner, and brute-force protection. It’s also one of the few plugins that makes you look at your traffic like an adult—you can see what’s hitting /wp-login.php, which IPs are being noisy, and what’s getting blocked.

    Where Wordfence shines (free tier):

    • WAF rules that block common exploit patterns
    • Malware scanning and file change detection
    • Login security controls (rate limiting, lockouts)
    • Visibility: live traffic, blocked requests, attack patterns

    Common mistake I keep seeing: people install Wordfence, feel safer, and then ignore the alerts. If you’re going to run it, you need to tune notifications so you don’t end up with inbox fatigue.

    How I configure it on a typical small business site:

    1. Turn on brute-force protection and set lockouts (don’t go extreme; you can lock out legit users).
    2. Disable XML-RPC if you don’t need it (a lot of sites don’t).
    3. Run an initial full scan, then schedule scans during off-hours.
    4. Check the “Live Traffic” view once a week for a month. After that, monthly is fine unless you’re under active attack.

    If you run WooCommerce or membership sites, be careful with aggressive blocking. I’ve seen stores block payment gateway callbacks and break checkouts—usually because someone flipped on strict rules without testing.

    2. Sucuri Security

    Sucuri Security is a solid “audit and integrity” tool. In practice, I like it when I want a simple security activity trail and file integrity monitoring without making the dashboard feel like a SOC.

    What it’s good at:

    • Security activity auditing (who did what, when)
    • File integrity monitoring (unexpected file changes)
    • Post-hack actions (useful if you’re recovering)

    Tradeoff: the plugin alone isn’t a magic shield. People confuse “scanner alerts” with “protection.” The alerts are still valuable because they push you to fix the root cause: outdated plugins/themes, suspicious file changes, or admin activity you don’t recognize.

    Mistake I’ve seen: site owners assume Sucuri will stop a brute-force attack by itself. You still need login protection (from Sucuri or another plugin) and decent hosting-level controls.

    3. iThemes Security

    iThemes Security packs a lot into one plugin: enforcing strong passwords, limiting login attempts, 2FA options, and general hardening.

    What it’s good for:

    • “Set it and forget it” hardening options
    • Strong password enforcement (huge, honestly)
    • Limiting login attempts and tightening admin behavior

    Where people trip: turning on every feature at once. I’ve watched teams enable aggressive file change detection + database tweaks + admin URL changes, and then forget what they changed. The next dev comes in, things don’t match documentation, and now you’ve got a mystery box.

    My approach: enable it in layers.

    • Start with password policy + login rate limiting
    • Add 2FA for admins and editors
    • Only then consider deeper hardening features

    4. All In One WP Security & Firewall

    This one is popular because it’s organized like a checklist—basic, intermediate, advanced—so non-security folks don’t feel lost.

    What it’s good at:

    • Login lockdown and brute-force protection
    • Basic firewall rules
    • IP blacklisting / whitelisting
    • A UI that encourages gradual improvement

    The tradeoff: “advanced” settings can cause real breakage if you don’t understand them. I’ve seen a site block legitimate RSS access and third-party integrations because someone toggled a rule without knowing what endpoint it affected.

    If you’re not sure, move one step at a time, test your contact forms, test checkout, test search, and check that your caching/CDN still behaves.

    5. MalCare Security

    MalCare’s big promise is simple: scan, detect, and help you clean up without burning a weekend. Even on the free side, it’s focused on malware detection and monitoring.

    Where it helps:

    • Malware scanning and alerts
    • Quick visibility into whether you have a real infection vs. “something feels off”

    Reality check: no scanner catches everything perfectly. You still need backups and an update routine. But a tool that spots infections early can be the difference between a 30-minute fix and a full “Google flagged my domain” nightmare.

    Importance of Free Security Plugins

    Free plugins aren’t “toy versions.” They usually cover the 80/20: stop the dumb automated stuff, warn you about risky changes, and give you controls that WordPress doesn’t ship with by default.

    But here’s the part people don’t like hearing: security plugins don’t replace basic hygiene.

    • Update WordPress core.
    • Update plugins/themes.
    • Remove what you don’t use.
    • Use real passwords and 2FA.
    • Keep clean backups.

    In 2026, it is reported that 13,000 WordPress sites are hacked daily due to outdated plugins and weak passwords, showcasing the critical need for proactive security measures (TechTide Solutions). If that number is even close to reality, it matches what I’ve seen firsthand: most compromises aren’t “zero-day genius.” They’re old vulnerabilities plus easy credentials.

    A practical “first hour” setup (what I’d do on a fresh install):

    1. Install one security plugin (don’t stack three WAFs).
    2. Turn on login protection (rate limiting + lockouts).
    3. Enable 2FA for admins.
    4. Run a full scan.
    5. Delete unused plugins/themes.
    6. Set a weekly update slot on your calendar.

    If you do just that, you’re already ahead of a lot of sites that get popped.

    Exploring WordPress SSO Solutions for Enhanced Security

    SSO isn’t about convenience. It’s about control.

    When you move logins to a central identity provider (Google Workspace, Microsoft Entra ID/Azure AD, Okta, etc.), you get a few things WordPress alone struggles with:

    • consistent 2FA enforcement
    • quick offboarding (disable one account, access dies everywhere)
    • fewer reused passwords floating around

    Yes, it makes login smoother. But the security win is that WordPress stops being the primary password vault for your team.

    MiniOrange SSO

    MiniOrange SSO is one of the more common WordPress SSO plugins because it supports multiple identity providers and different protocols depending on what you’re using (SAML, OAuth/OIDC).

    It can integrate with Google, Facebook, and Microsoft, which covers the reality for most small orgs: people already have those accounts.

    Benefits of SSO in WordPress Security

    1. Reduced Password Fatigue: Users are less likely to use weak or reused passwords since they only need to remember one.
    2. Streamlined Login Process: SSO allows for quicker access, improving user experience.
    3. Centralized User Management: Admins can manage user access more efficiently, monitoring who has access to what.

    I’ll add a fourth, because it’s the one that saves your skin during incidents:

    1. Faster containment: if you suspect an account is compromised, you kill the identity provider session and rotate credentials in one place.

    A real SSO scenario (where it helped)

    A team I worked with had a WordPress site with ~20 authors and editors. Turnover was normal—contractors, guest writers, marketing interns. The site didn’t get hacked through some exotic exploit. Someone left the company and their WordPress user never got removed. Months later, that same credential set worked (password reuse is undefeated), and suddenly new “admin” users appeared.

    Nothing fancy. Just neglected access.

    After switching to SSO tied to their Google Workspace:

    • offboarding became “disable Google account”
    • 2FA was enforced centrally
    • WordPress stopped storing the primary password people cared about

    That change didn’t solve every security problem, but it shut down a whole class of them.

    Step-by-step: how I roll out SSO safely

    SSO can absolutely lock you out if you rush it. Here’s the rollout order I trust:

    1. Create a break-glass admin account
    2. A separate WordPress admin with a long random password.
    3. Store it in a password manager.
    4. Do not use it day-to-day.

    5. Pick one identity provider

    6. If you’re already on Google Workspace or Microsoft, start there.
    7. Don’t add multiple IdPs “just in case” unless you have a real reason.

    8. Enable SSO for a pilot group

    9. Start with yourself and one other admin.
    10. Confirm you can log in, log out, and log back in.

    11. Map roles carefully

    12. Make sure an “employee” in the IdP doesn’t become an “administrator” in WordPress by default.
    13. Least privilege wins.

    14. Enforce 2FA at the identity provider

    15. This is the whole point. If you don’t enforce MFA/2FA, you’ve just moved passwords around.

    16. Roll out to editors/authors

    17. Communicate what’s changing.
    18. Expect questions like “why can’t I use my old login?”

    19. Disable WordPress password login (optionally)

    20. Only after you’ve proven SSO works.
    21. Keep the break-glass admin as your fallback.

    Common SSO mistakes (I’ve seen all of these)

    • No break-glass admin → one misconfig, and you’re locked out.
    • Role mapping too generous → users get admin when they shouldn’t.
    • Not enforcing 2FA in the IdP → you gain convenience, not security.
    • Ignoring service accounts → integrations still need access; plan them.

    As a CEO, I’ve dealt with countless security issues, and one of my biggest lessons learned is that managing user access is just as crucial as protecting the website itself. Implementing an SSO solution can drastically reduce potential entry points for attackers.

    Conclusion: Your Security Strategy Matters

    The uncomfortable truth: security plugins are only as good as your habits.

    If you install a plugin and never update anything again, you’ll still get hit. If you lock down logins but keep five abandoned plugins active, you’re still exposed. If your team shares one admin account, you’ve basically opted out of accountability.

    With over 11,334 new vulnerabilities disclosed in the WordPress ecosystem last year (TechTide Solutions), you don’t need to be paranoid—you need to be consistent.

    Here’s the security strategy I push because it holds up under real-world mess:

    • Pick one main security plugin (Wordfence or iThemes or All In One, etc.). Stacking overlapping tools tends to create conflicts and alert fatigue.
    • Harden logins (rate limits + 2FA for privileged roles).
    • Patch like it’s your job (weekly schedule; emergency updates when a critical bug drops).
    • Backups you’ve actually tested (a backup that can’t be restored is a feel-good file).
    • Access control that matches your org (remove users, enforce least privilege, consider SSO once your team grows).

    One more thing that doesn’t get said enough: measure the boring stuff.

    • When was the last update applied?
    • How many admin users exist right now?
    • How many plugins are inactive but installed?
    • Do you know where your backups live?

    If you can answer those without guessing, you’re in good shape.

    Next step: pick one plugin from the list, implement the “first hour” setup above, and put a recurring calendar block for updates. Security that isn’t scheduled is security that won’t happen.

    My Experience With This

    I’m Mobeen Abdullah. I run Revnix, and I’ve spent over a decade building cloud-native solutions and security strategies. I’ve also had to do the unglamorous part: cleaning up compromised sites, tracing how access was gained, and explaining to stressed-out teams why “we installed a security plugin” didn’t prevent a mess.

    One incident I still remember: a content site started throwing random redirects only on mobile. Desktop looked fine. The owner thought it was an ad network problem. It wasn’t.

    What actually happened was classic:

    • an outdated plugin provided the entry point
    • a malicious PHP file got dropped into a writable directory
    • the malware served conditional redirects (user-agent based), so the team didn’t see it during quick checks

    The fix wasn’t just “scan and delete.” We had to:

    1. Put the site in maintenance mode (stop the bleeding).
    2. Rotate passwords (WordPress admins, hosting panel, database, SFTP).
    3. Reinstall clean core files (don’t trust compromised ones).
    4. Remove the vulnerable plugin and replace it.
    5. Scan + diff key directories (wp-content/plugins, wp-content/uploads, mu-plugins).
    6. Add login controls + 2FA so the next attempt was harder.
    7. Set up a weekly update cadence—because the root cause was neglect, not lack of tools.

    That’s why I’m biased toward boring, repeatable security: fewer plugins, clear ownership, and a routine. Tools help, but habits win.

    If you want more comparisons and perspectives, here are a few decent roundups worth skimming (then make your own call):